

How to build patterns from your design system components with AI
Step-by-step guide

👋 Get weekly insights, tools, and templates to help you build and scale design systems. More: Design Tokens Mastery Course / YouTube / My Linkedin

New here? Start and check the AI Component Generation Framework first. 😉
Last week, I showed you how to generate components with AI.
Now you’re sitting on a collection of buttons, inputs, and checkboxes that match your design system perfectly.
But here’s where most designers get stuck:
You have components, but you don’t have patterns.
You don’t have a contact form.
You don’t have a working prototype you can test with users.
Reality check:
AI can’t build what it doesn’t understand.
Patterns are how you teach it to think in systems.
The real problem
You’ve designed a beautiful payment form in Figma. Now what?
Option 1: Hand it to developers and wait 2 weeks for a prototype. By then, your assumptions might be wrong.
Option 2: Build a static prototype in Figma. Looks great, but you can’t test real validation, error states, or the actual submission flow.
Option 3: Learn React, Next.js, form libraries, and spend weeks becoming a developer. Not realistic when you have design work to do.
Option 4: Teach AI to assemble your components into working patterns. Get a clickable prototype in an afternoon.
This guide shows you Option 4.

Approach 1: Simple
Use when you have components ready and need to wire them together into common patterns (contact forms, login flows, search interfaces).
Approach 2: Context-Aware Generation
Advanced usage when your pattern needs more context to adapt. For example, regional compliance, localization (language and currency), or platform-specific behavior (iOS vs. Android).
Let’s start with the simpler one.
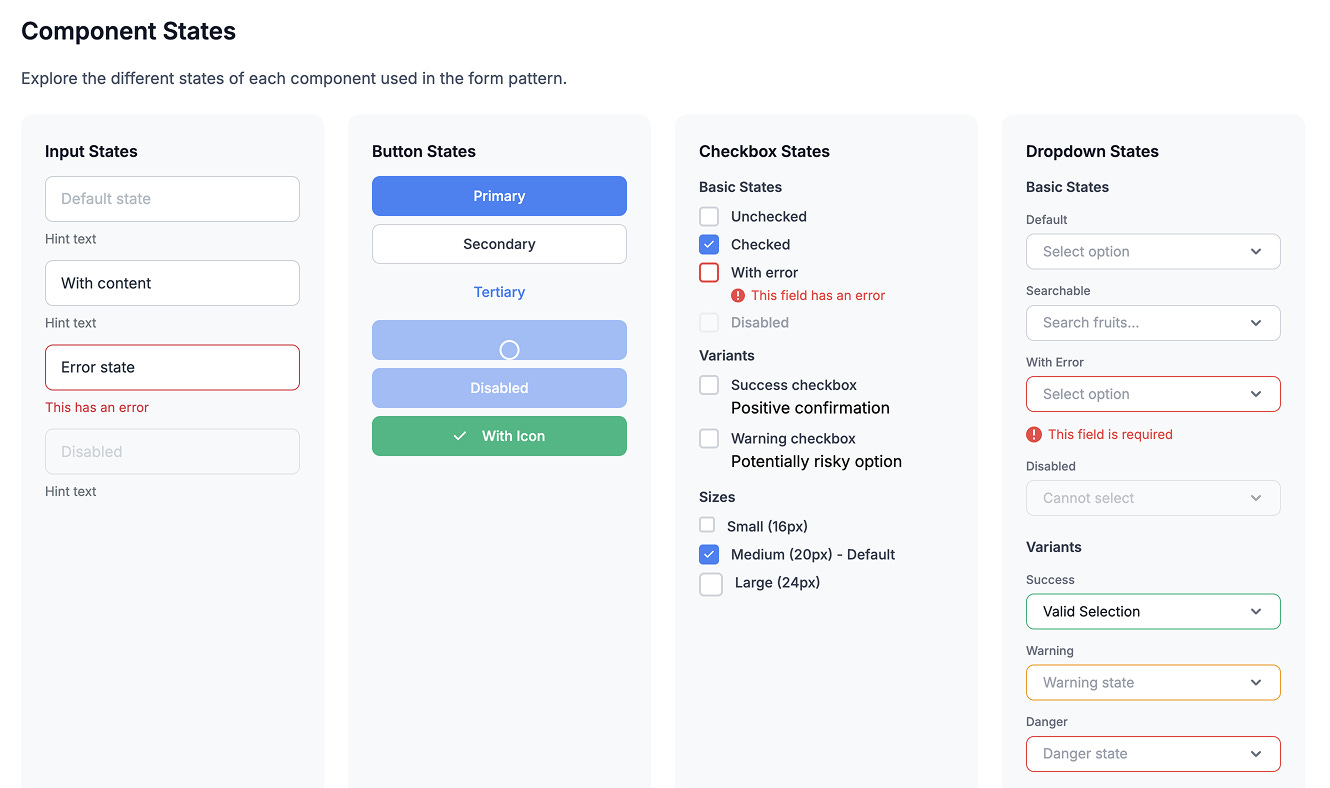
Step 1: Define your pattern structure
If you tell AI “create a contact form,” you get random components that don’t match your design system. The form might work, but it looks nothing like your designs.
You need to tell AI which components to use and exactly how to combine them. I keep all the components in the same folder.
Before asking AI to build anything, create a simple document. This document is like your “Slack message” to your developer.
Pattern: Contact Form

Components to use:
- Input (folder XY)
- Checkbox (folder XY)
- Button (folder XY)
- Dropdown (folder XY)

What it needs to do:
- Collect name, email, agreement
- Validate email format
- Show errors inline
- Submit to an endpoint
- Show success state

What it should NOT do:
- Create new components
- Modify existing components
- Use different spacing than our system
Step 2: Map every state
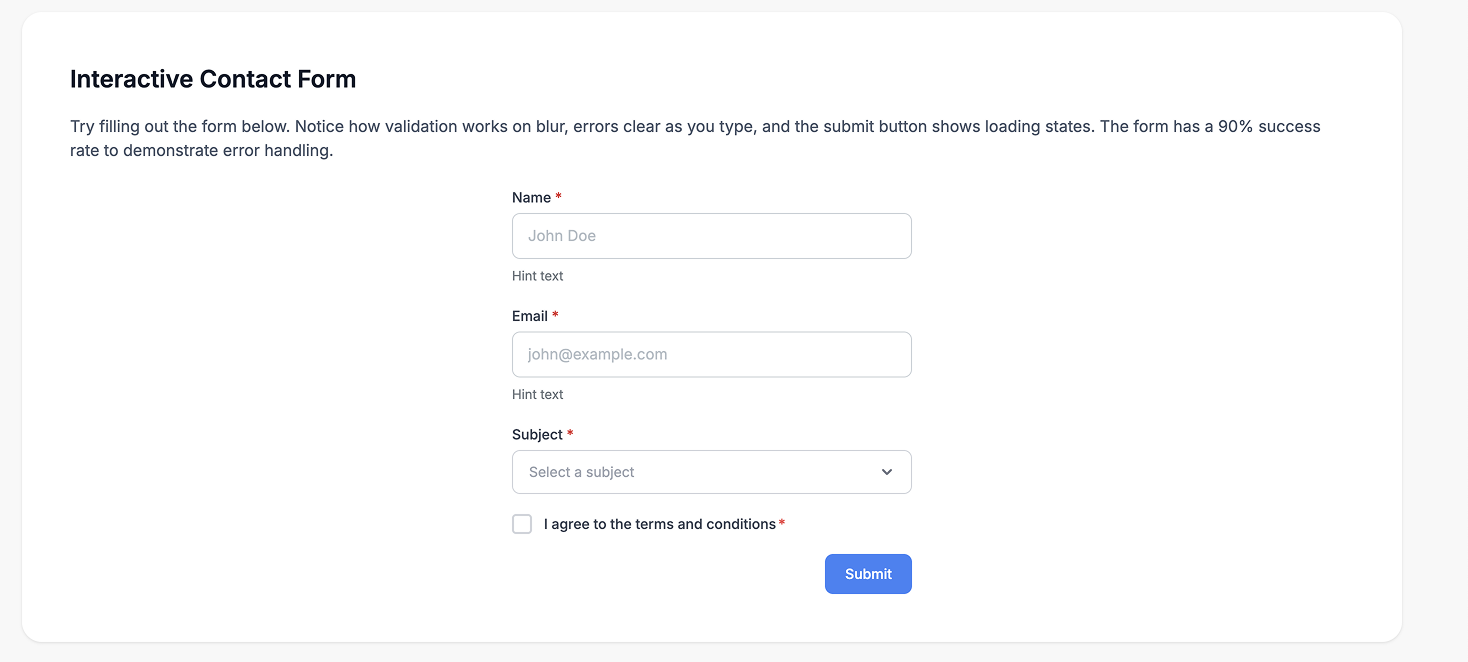
You need to tell AI about every state your pattern can be in.
📋 Required States:
✓ Empty          → User first sees form
✓ Typing         → User is filling fields
✓ Validating     → Checking for errors
✓ Error          → Something’s wrong
✓ Submitting     → Processing
✓ Success        → Completed
For each state, specify:
What the user sees
What buttons are enabled/disabled
Where focus should be
What error messages appear
If you use an input field component, and you already specified everything there, you don’t need to repeat the guidelines.
Step 3: Define interaction flows
Walk through what happens when a user interacts with your pattern. This is your storyboard. AI can’t guess these details; you need to specify them.
When user clicks submit:
1. Validate all fields
2. If errors exist:
   - Show red borders on invalid fields
   - Display error messages below fields
   - Focus on first error
   - Keep submit button enabled
3. If valid:
   - Disable submit button
   - Show loading spinner on button
   - Submit to endpoint
   - Wait for response
4. On success:
   - Hide form
   - Show success message
   - Include “Submit another” button
5. On error:
   - Show error message at top
   - Re-enable submit button
   - Allow user to retry
Step 4: Specify responsive behavior
Your pattern needs to work on various devices. If you already have a markdown file where you wrote about this, you don’t need to repeat the same things; add additional rules.
Mobile (under 640px):
- Full width form
- Stack all inputs vertically
- Full width button
- Touch-friendly tap targets (48px minimum)

Desktop (over 640px):
- Max width 480px
- Center aligned
- Right-aligned button
- Standard spacing

and so on ...
With this definition, AI can generate a working prototype that:
Uses your actual design system components
Handles all states correctly
Works on mobile and desktop
Feels like a real product
Approach 2: Context-aware generation
Let’s take an example when patterns need to adapt to regions, platforms, or compliance requirements.
Let’s imagine you ask AI for a “payment form”. You get:
Generic payment methods (no SEPA, Giropay, or region-specific options)
English only (no localization)
Missing compliance (no GDPR consent, no PSD2 authentication)
Desktop-only (no mobile optimization)
If you’re designing for European markets, this is useless. Instead of explaining regional requirements every time, create context files that AI can reference:
.context/
├── regions/
│   ├── germany.md
│   ├── france.md
│   └── netherlands.md
├── platforms/
│   ├── mobile-ios.md
│   └── web-responsive.md
└── compliance/
    ├── gdpr.md
    └── psd2.md
These files contain everything AI needs to know about designing for specific contexts.
Example: Germany
Create a file that captures everything unique about designing for Germany:
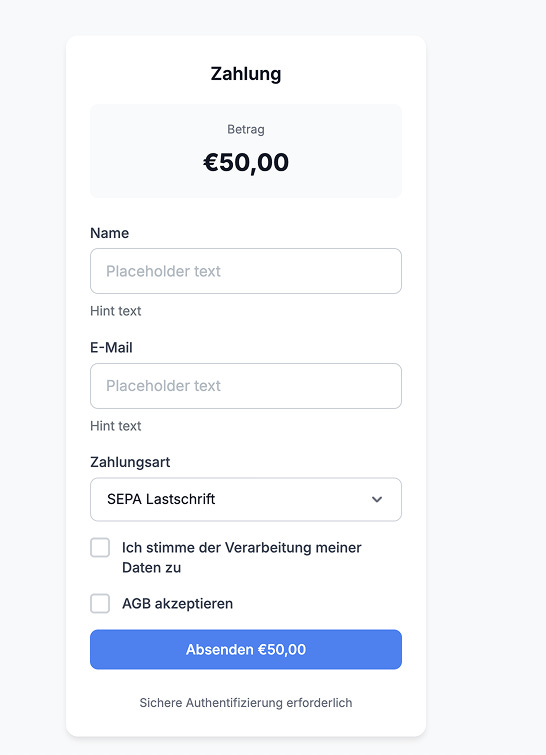
# Germany Region Context

## Language & Formatting
- Language: German (formal “Sie”)
- Currency: €1.234,56 (comma decimal, period thousands)
- Date: DD.MM.YYYY
- Phone: +49 format

## Payment Methods (in order of preference)
1. SEPA Direct Debit (most common)
2. giropay
3. Credit Card
4. PayPal

## Required Compliance
- GDPR consent checkbox
- Link to Datenschutzerklärung (privacy policy)
- Link to Impressum
- Right to withdraw consent
- PSD2 Strong Customer Authentication

## Validation Rules
- IBAN: DE + 20 digits
- VAT ID: DE + 9 digits
- Postal code: 5 digits
- Phone: +49 + area code + number

## UI Conventions
- Formal address (Sie, not du)
- VAT included in prices
- 14-day return policy notice required
- Full legal company name
All without you having to repeat regional requirements every time (yep, that’s why you need guidelines markdown files).
Example: iOS
Capture platform-specific design patterns:
# iOS Platform Context

## Screen Sizes to Support
- iPhone SE: 375px (minimum)
- iPhone XY ...

## Touch Targets
- Minimum: 44x44 pt
- Recommended: 48x48 pt
- Spacing between: 8pt minimum

## Navigation
- Back button: Top-left with < arrow
- Primary action: Top-right
- Modal sheets for forms
- Bottom tab bar for main navigation

## Input Behavior
- Use native iOS keyboards
- Native date/time pickers
- Support Face ID / Touch ID
- Apple Pay integration

## Accessibility
- Support Dynamic Type
- VoiceOver labels on all interactive elements
- WCAG AA contrast minimum
Using context for building new patterns:
Now, when you need a pattern, you can reference your context folder or document:
Create a payment form with these contexts:

REGION: Germany (@context/regions/germany.md)
PLATFORM: iOS (@context/platforms/mobile-ios.md)
COMPLIANCE: GDPR + PSD2 (@context/compliance/)

Pattern requirements:
- Collect payment for €50 purchase
- Support SEPA and credit card
- Include GDPR consent
- Handle 3DS authentication

Use our design system components:
- Input
- Button
- Checkbox
- Create PaymentMethodSelector if needed
Building your context library
Start with what you already know:
→ Your markets
Language and formatting
Payment preferences
Compliance requirements
Cultural conventions
→ Your platforms
iOS, Android, Web
Screen sizes
Navigation patterns
Platform-specific features
→ Your compliance requirements
→ Industry-specific information
→ User information
Now it is your turn
Pick one simple pattern (newsletter signup, contact form)
Define all its states and interactions
Generate it with AI using your design system components
Test every interaction
Document what worked as a template
Once you have one working pattern, you have a template. Create 3-5 templates for common patterns. Then build your context library.
Create pattern templates:
Store these in .patterns/ folder:
form-pattern-template.md
list-pattern-template.md
modal-pattern-template.md
Describe how components work together (or add relationship diagram):
Input + Form contract:
- Input accepts error prop for validation
- Form controls Input via name prop
- Focus management via ref

Button + Form contract:
- Button accepts loading prop
- Form controls disabled state
- Submit type triggers form validation
↪️ For design leaders
Quality checklist for AI-generated patterns:
Before accepting a pattern, verify:
Uses design system components correctly
All states are defined and work
Responsive on mobile and desktop
Accessibility requirements met
Follows platform conventions
Regional compliance included
Error handling is clear
Verify context ownership (Legal, compliance, security)
and add your own
Review quarterly or when regulations change.
↪️ For designers
Week 1: Create one simple pattern (contact form)
Define all states
Map all interactions
Test on mobile and desktop
Week 2: Add context (localization)
Create a context file for one market
Generate a pattern with context
Week 3: Build pattern library
Document 3-5 common patterns
Create reusable templates
Share with the team
Soooo, why do you need to try this out?
No 2-week developer wait, and you only pay for tokens
No back-and-forth on requirements
No “lost in translation” design handoffs
Test with users on the same day
Excitement when your prototype is clickable 😊
PS. A video is coming to my YouTube channel in the coming days.
Until next time,
Romina 🙌
— If you enjoyed this post, please tap the Like button below 💛 Thank you.
💎 Community Gems
✨ The Component Gallery
It’s always a good idea to have this website somewhere near you
🔗 Link
Anova (Figma plugin)
Nathan Curtis
🔗 Link
Love this! Quick one: if I use Figma MCP, do I still need to let the agent know which components to use in a design?
I find that anytime I don't tell them exactly which components are present (even if I have them coded in the same prototyping folder and have the same names from the Figma components I use) it tends to use random ones or create new ones :/