

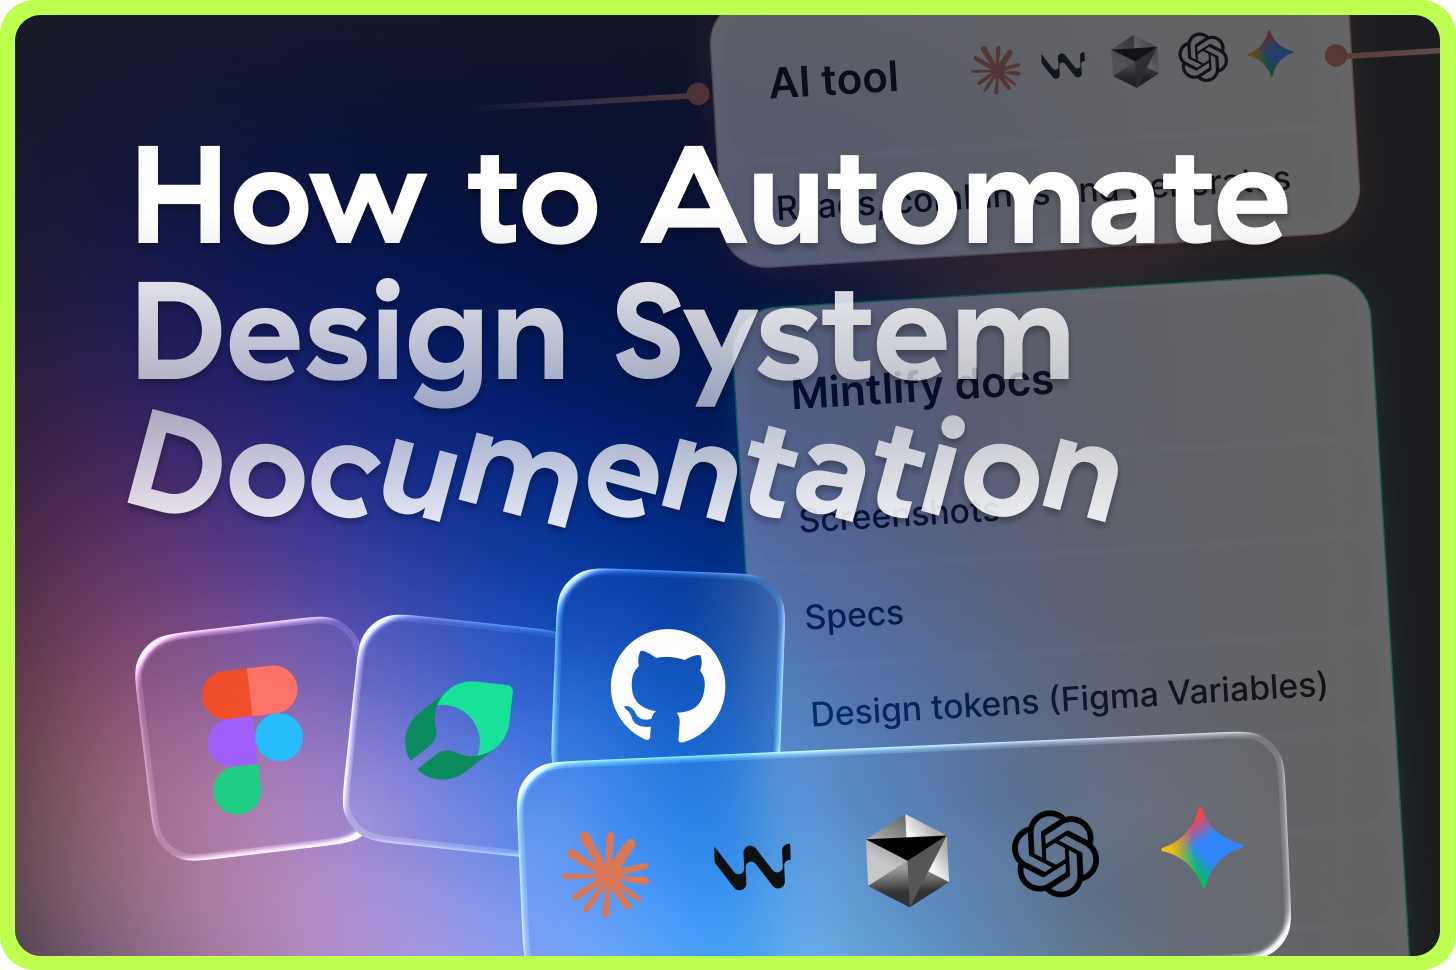
How to Automate Design System Documentation
From Figma to Mintlify

👋 Get weekly insights, tools, and templates to help you build and scale design systems. More: Design Tokens Mastery Course / YouTube / My Linkedin
Your design system has a 3-week lag problem.
Designer updates the button in Figma. The developer implements it. Someone remembers to update the docs in a week or two … (maybe).
And then:
People waste hours hunting for the correct specs
“Is this the latest version?” at least 12 times per sprint
Implementation errors happen because of the outdated docs
30% of components are still using old tokens 6 months after migration
Another problem is that teams maintain multiple sources of truth. Some rely on Figma, some on Storybook, others have Storybook + custom design system documentation, or 3rd-party design system platforms (where you are locked in).
But the storyline is always the same. Nobody has time to write the docs, update screenshots, and add guidelines and educational material.
Most teams try to solve this by improving their processes. Involve more people and rules. Have stricter update cadences. Automated reminders. Ohhh, that’s optimizing the wrong thing.
The only way to kill latency is to connect your tools so they document themselves.
This guide shows you how to do exactly that. 👇
What we’re building
We’re connecting three systems: Figma (via API and MCP), an AI tool (choose your favourite one), and Mintlify for documentation.
What is MCP? Model Context Protocol (MCP) is a standard that lets AI tools like Claude Code directly read data from other applications. Instead of you manually copying specs from Figma, MCP lets Claude read them directly. Think of it as giving Claude read-only access to your design files.

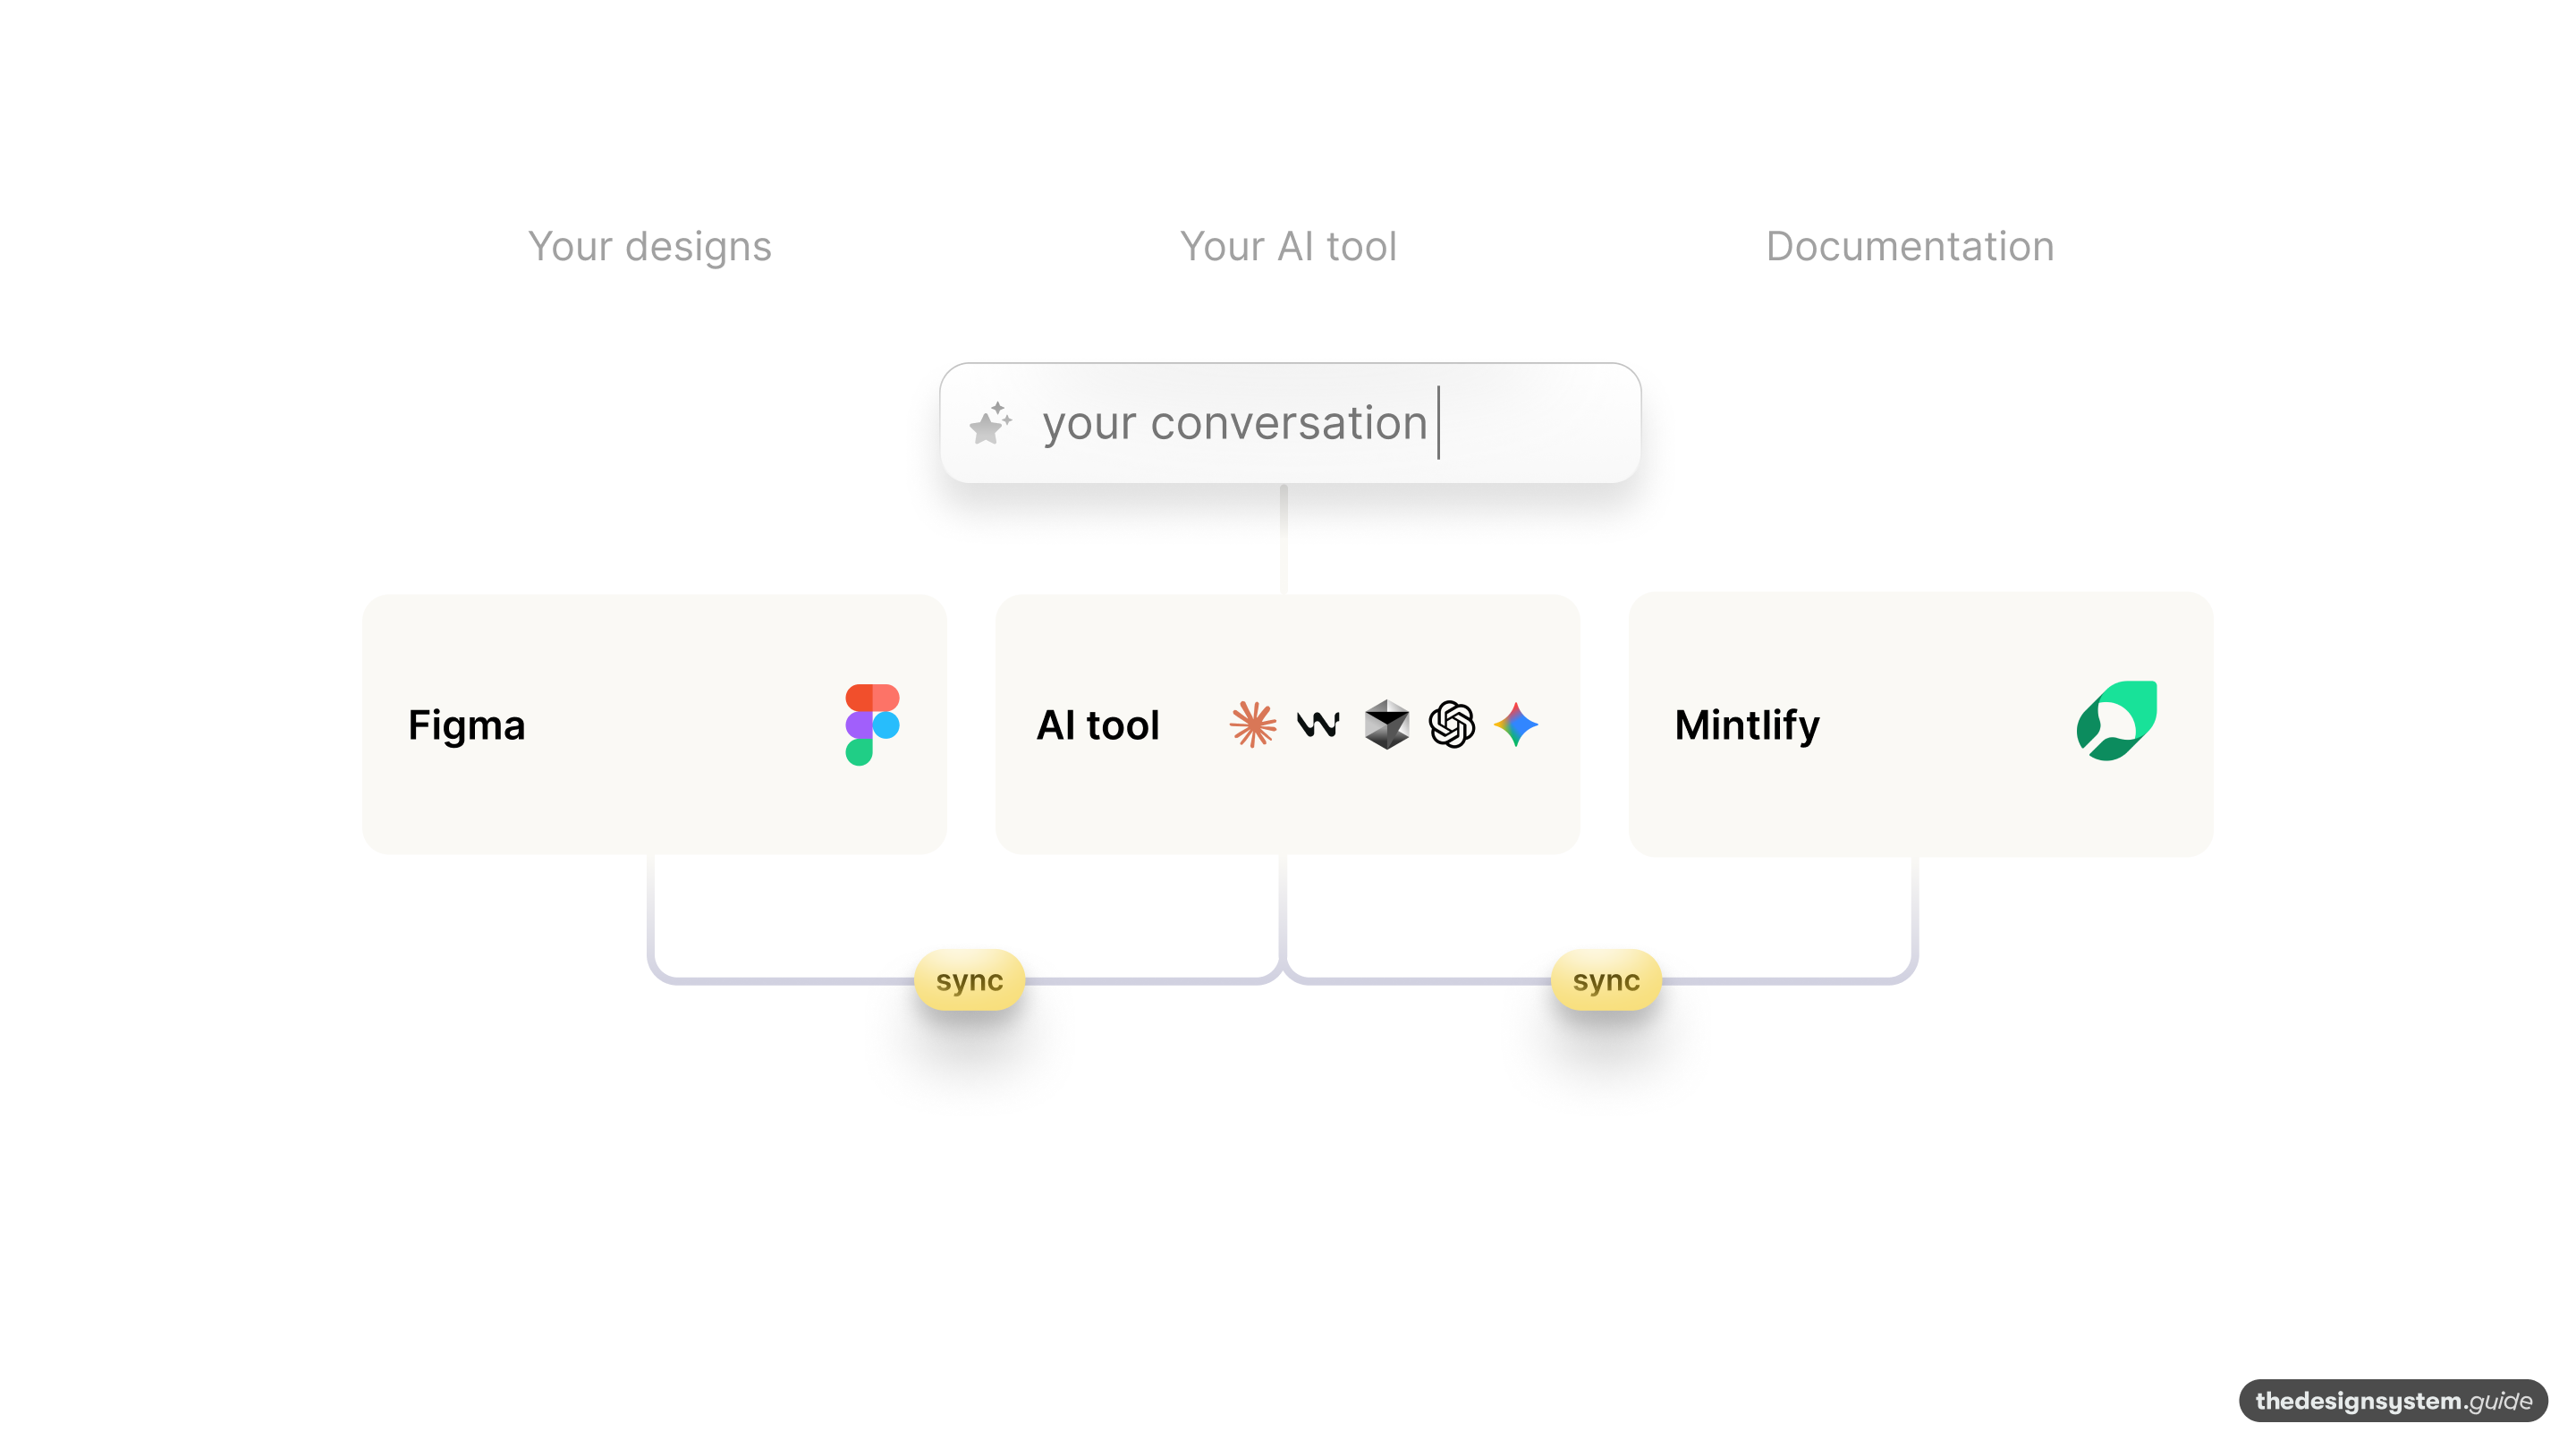
AI reads the current state of Figma in real-time AND your existing docs from the codebase. When you push updates, Mintlify (your documentation hosting platform) automatically rebuilds and deploys your docs site. No manual screenshot exports, no copy-paste specs, no documentation lag.
How it works
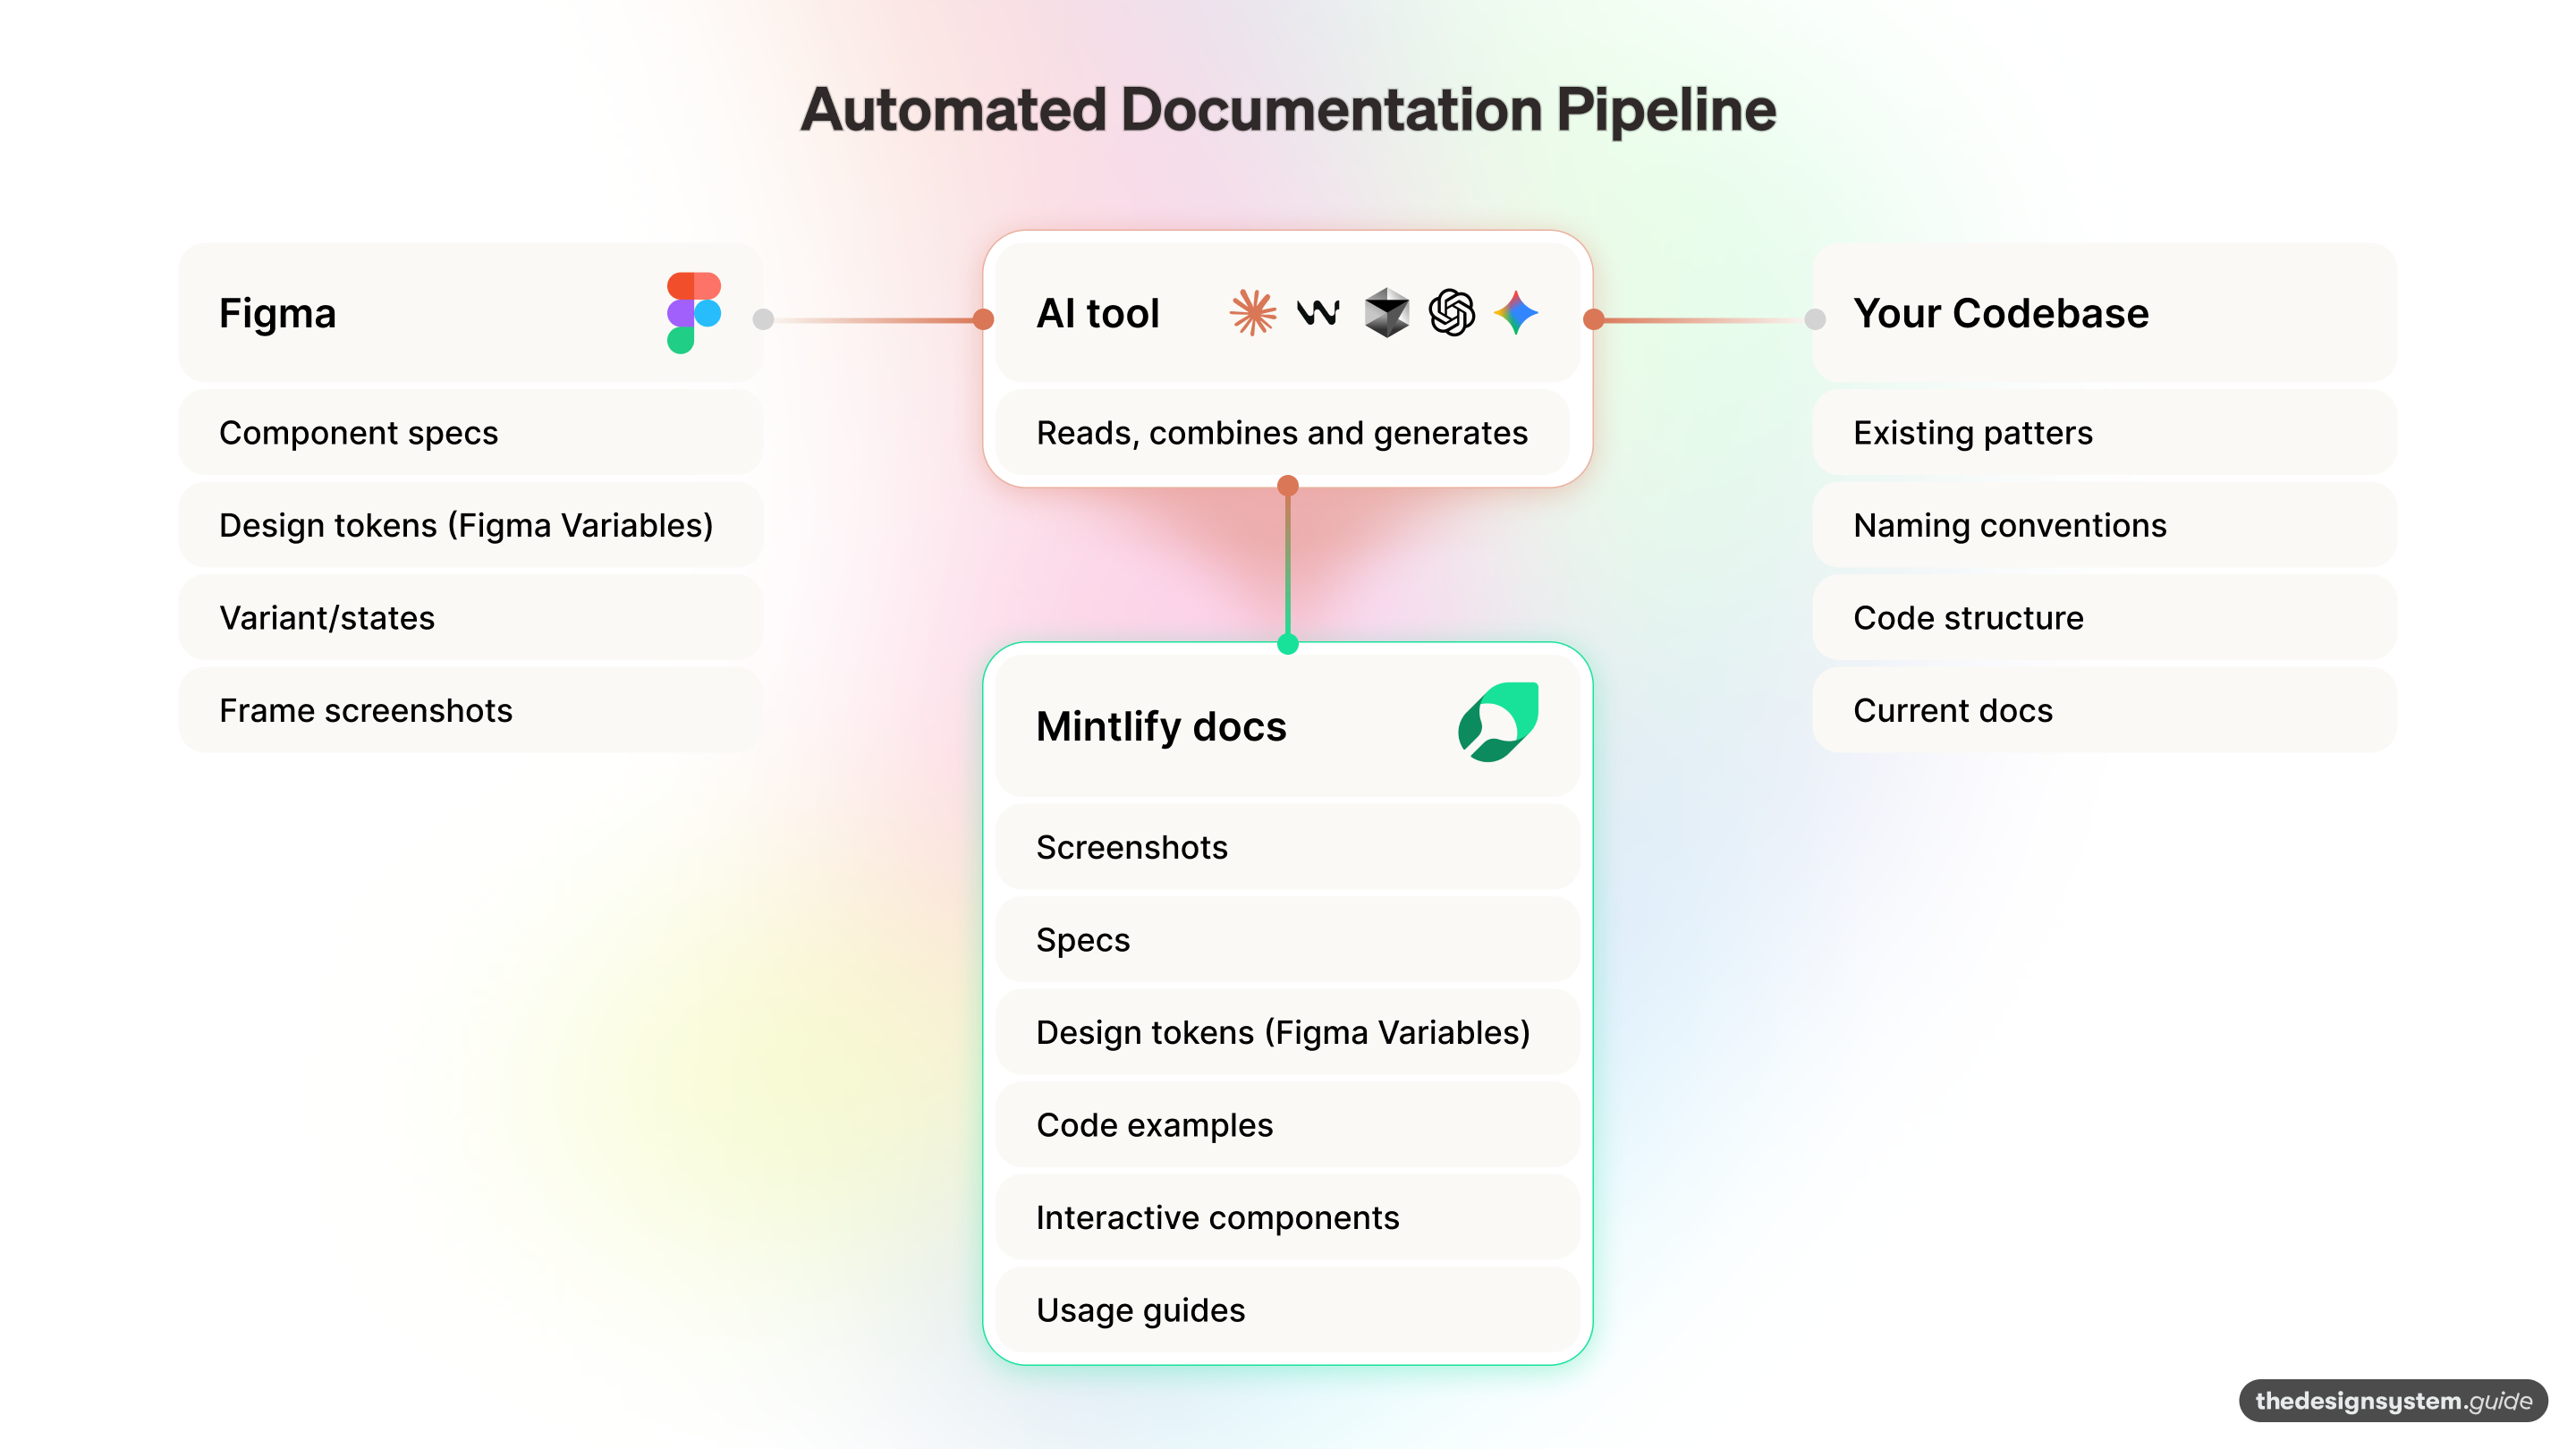
What flows through the system:
FROM FIGMA (via Personal Access Token + MCP):
• Current component specifications (spacing, colors, typography)
• Exact token names from Figma Variables
• Component variants and interactive states
• High-res screenshots (2x PNG exports)
• Frame last modified timestamps
FROM YOUR CODEBASE:
• Existing documentation markdown files (.mdx)
• Usage guidelines and behavioral patterns
• Accessibility requirements you’ve written
• Code examples and edge cases
• Frame ID tracking comments: <!-- figma-frame: ... -->
TO MINTLIFY DOCS (via Git push):
• Auto-updated screenshots from Figma frames
• Synced specifications (padding, colors, tokens)
• Generated components matching YOUR code patterns
• Updated tests based on documented behaviors
• Pull requests with before/after visual diffs
When we want to update documentation, we have two options. On-demand with copy-pasting our Figma link OR automatically (for example, every week on Monday).
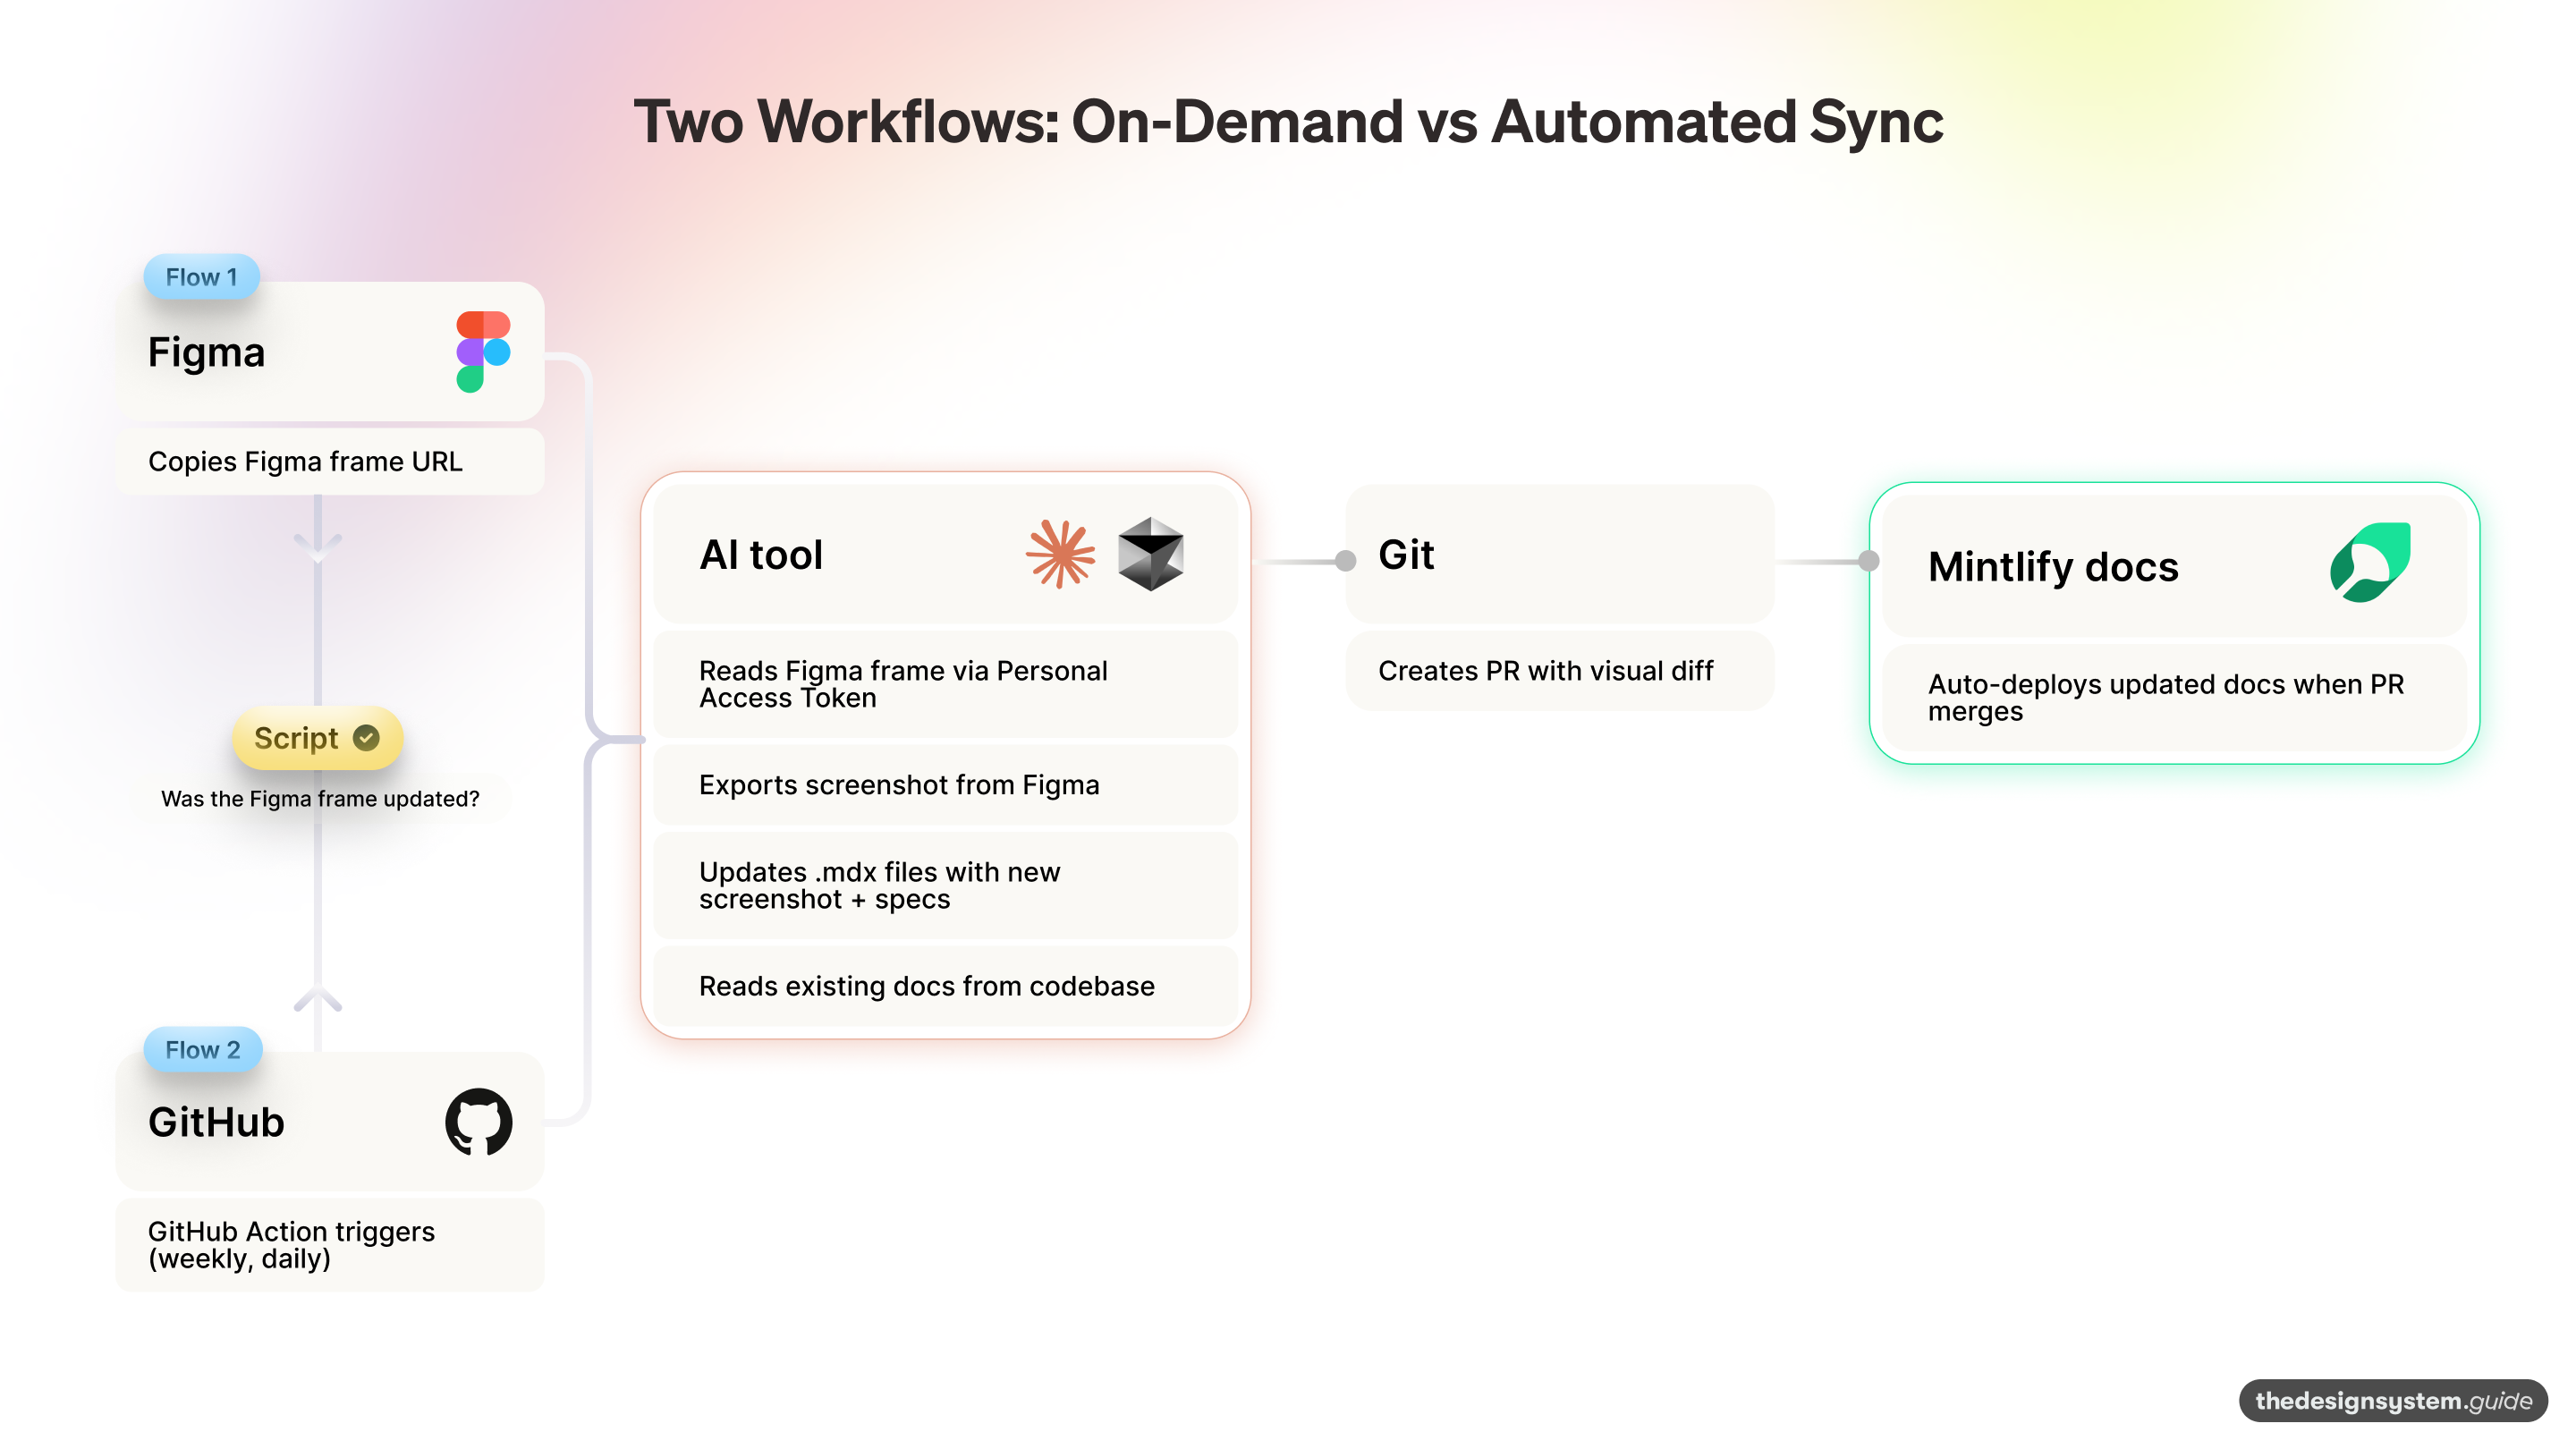
Flow 1: On-demand sync → designers share a Figma link in the AI tool
Designer → Copies Figma frame URL
         ↓
Pastes in AI tool: “Update button docs from this frame”
         ↓
Claude Code → Reads Figma frame via Personal Access Token
            → Exports screenshot from Figma
            → Reads existing docs from codebase
            → Updates .mdx files with new screenshot + specs
         ↓
Git → Creates PR with visual diff
         ↓
Mintlify → Auto-deploys updated docs when PR merges
🕐 Time: 30 seconds vs 30 minutes of manual work
What gets updated:
Component screenshot (auto-exported from Figma frame)
Visual specifications (spacing, colors, typography)
Token references (reads Figma Variables)
Component variants and states
Flow 2: Automated Weekly Sync (GitHub Action)
In your Mintlify docs, you track frame IDs. The comment <!-- figma-frame: your-file-name/45-890 --> tells the automation which Figma frame to check.
To make this work, you will need to create a GitHub Action that checks for tracked frames weekly. This would happen via the Figma API.
🕐 Time: Fully automated, zero manual work
Now let’s go through the setup. ✨
Step 1: Set up a Mintlify account & GitHub repository
What is Mintlify?
Mintlify (mintlify.com) is a documentation hosting platform that turns your markdown files into beautiful, searchable doc websites. Think of it as Vercel, but specifically for documentation. You write docs in .mdx files in your Git repo, push changes, and Mintlify automatically rebuilds and deploys your docs site in 2-3 minutes. It’s where you document how components behave, when to use them, and why.
1. First, create a Mintlify account
Go to mintlify.com and click “Sign Up”. Choose “Sign up with GitHub”. This is the easiest method since Mintlify needs access to your docs repository anyway.
2. Authorize GitHub access
Mintlify will ask for permission to:
Read your repositories
Write to repositories (for automatic deployments)
Access webhooks (to trigger rebuilds on push)
Click “Authorize Mintlify”.
3. Create or connect your docs repository
Option A: Start from scratch and create a new GitHub repository
Click “Create new documentation”
Choose “Start from template”
Mintlify creates a new GitHub repo with starter docs
Name it something like
design-system-docs
Option B: Use existing docs repo
Click “Import repository”
Select your existing documentation repository
Mintlify expects your
.mdxfiles in adocs/or root folderAdd a
mint.jsonconfig file if you don’t have one
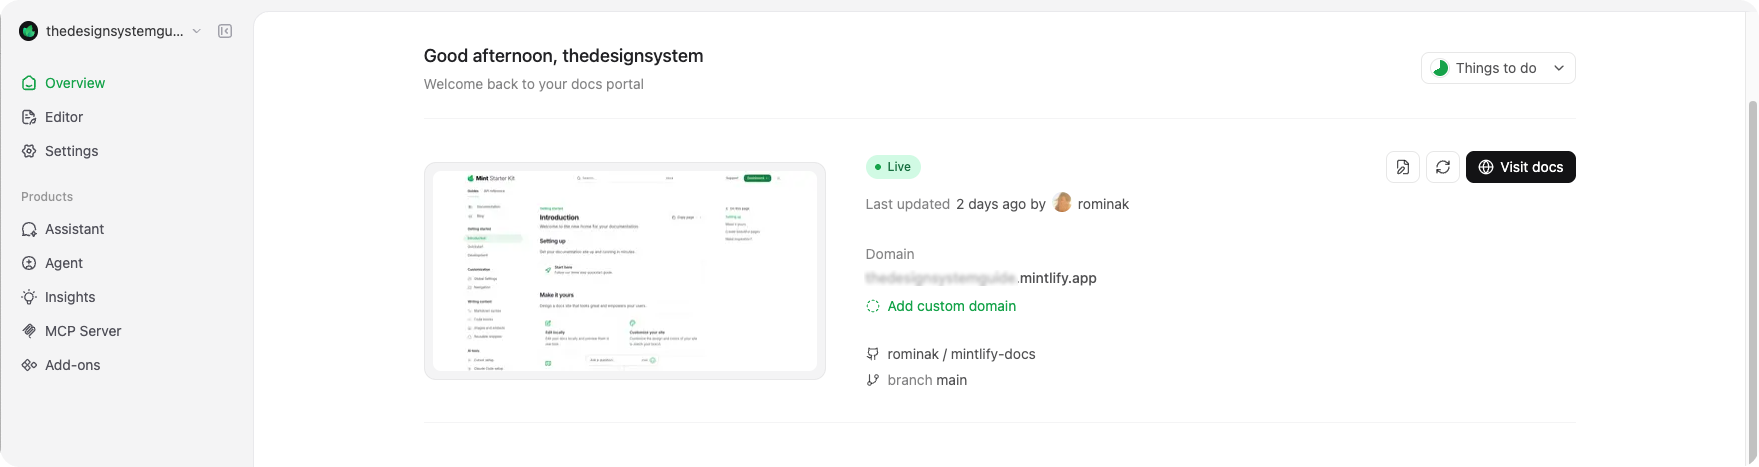
5. Get your docs URL
After the first deploy (2-3 minutes), Mintlify provides:
Subdomain:
your-project.mintlify.app(free)
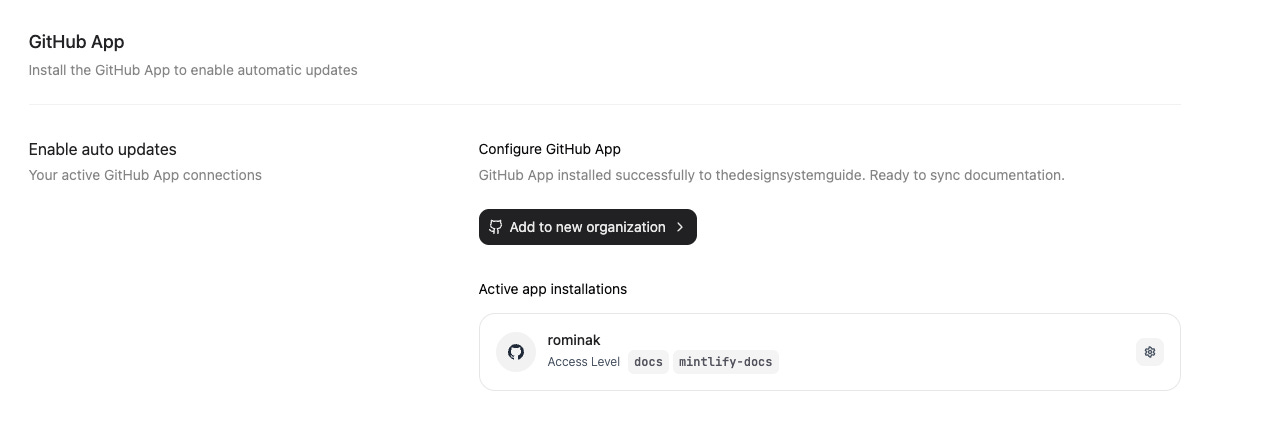
The most important part here is that you will have to install the GitHub app (in other words, connect Mintlify and GitHub with the extension), and you will see my screenshot below:
Your setup is complete when:
✅ GitHub is connected to Mintlify
✅ Your docs repo is linked
✅ You can view your docs at
your-project.mintlify.app✅ Pushing to GitHub auto-deploys updates
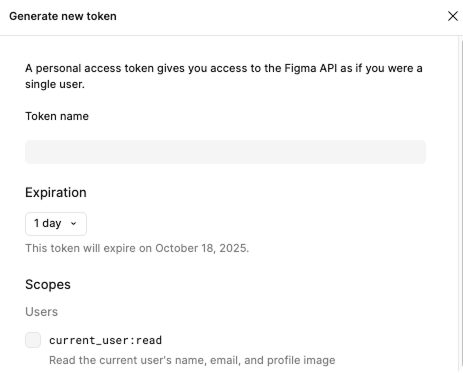
Step 2: Get Figma Personal Access Token
You need a Figma Personal Access Token to allow Claude Code to read your Figma files and export screenshots automatically.
Click “Generate new token”
Name it: “Claude Code MCP”
Scopes needed:
File content(read-only)Copy the token (starts with
figd_...)Important: Save it securely - you won’t see it again
Step 3: Connect Figma MCP
Now connect Figma to Claude Code so it can read your design specs and export screenshots.
If you are not sure how and where to add Figma MCP to your AI tool, watch my instructions video.
Test it:
“List all components in (your figma link) ”Step 4: Use Claude Code to write documentation
Now everything’s connected. Let’s automate your first doc update.
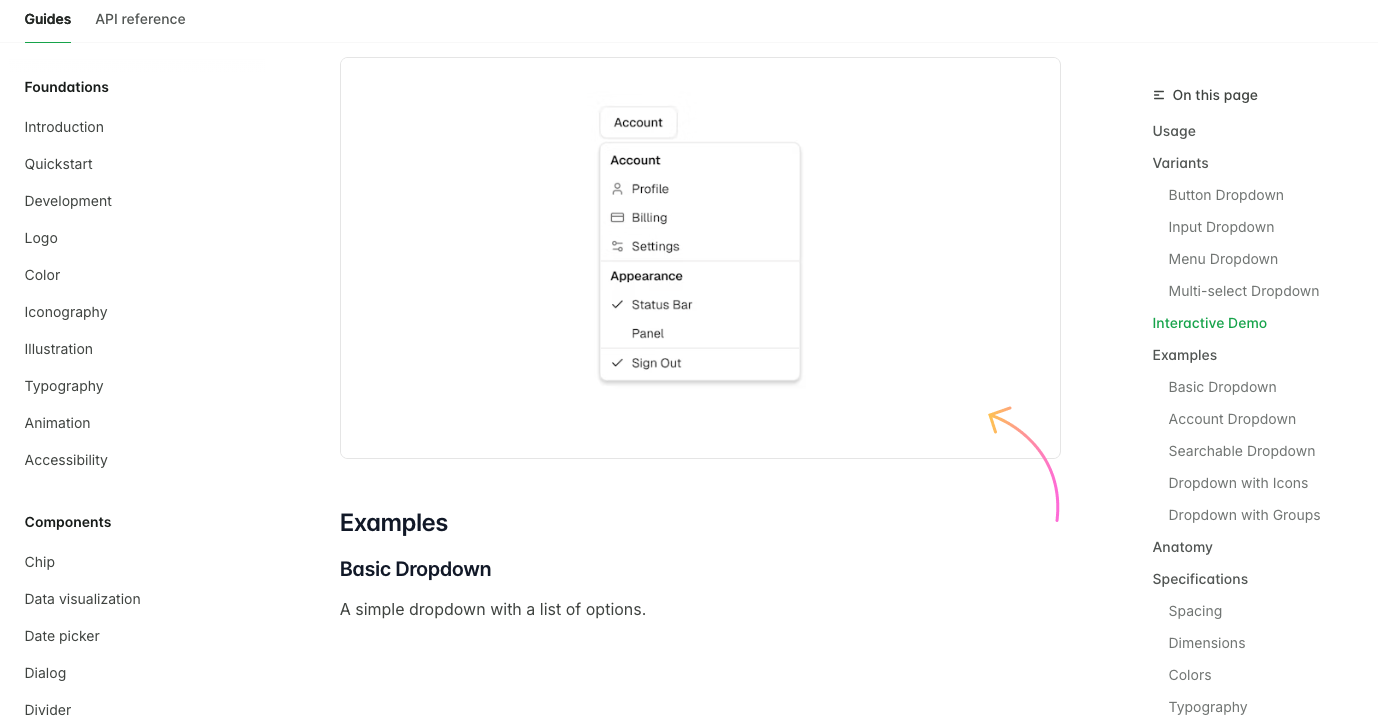
I suggest you use Claude Code for writing your first sample page, for example, a dropdown.
Create documentation for the Dropdown component from this Figma frame:
https://figma.com/file/abc123?node-id=45-890

Include:
- Component description
- When to use it
- All variants and states
- Specifications (spacing, colors, tokens)
- Accessibility requirements
- Usage examples

Add a tracking comment <!-- figma-frame: FILE_ID/NODE_ID -->
so the weekly automation can check this frame for changes.
What gets automated:
Screenshot export from Figma
Spec extraction (spacing, colors, tokens)
Documentation file creation/updates
Git commit and PR creation
Mintlify deployment
🫶 If you intend to use Claude Code for writing your documentation, I suggest you create a Markdown file with your writing guidelines. Add tone and voice, rules for writing, examples for “dos and don’ts”, etc. This will help you achieve consistent results. If you are unsure what I’m talking about, read this article that explains how to create guideline folders. 👇

Step 5: GitHub Actions Setup / Advanced
What is GitHub Actions?
GitHub Actions is GitHub’s built-in automation platform. Think of it as a scheduled robot that lives in your repository. You can tell it to run scripts every Monday morning, check for changes, and create pull requests automatically (no server setup required).
Create the sync script
Write the code manually, or ask your AI tool to create a sync script (like I did).
Create a complete GitHub Actions workflow that automatically syncs Figma screenshots and specifications to my documentation. Here’s what I need:

Requirements:

1. Workflow Configuration
   - Runs every Monday at X am UTC
   - Can also be manually triggered via workflow_dispatch
   - Uses ubuntu-latest runner

2. Core Functionality
   - Scan all `.mdx` files in my docs folder for HTML comments with format: `<!-- figma-frame: FILE_ID/NODE_ID -->`
   - For each tracked Figma frame:
     * Check if the Figma frame has been modified since the last screenshot was taken
     * If modified, export a new 2x PNG screenshot via Figma API
     * Read the frame specifications (spacing, colors, typography, tokens) via Figma API
     * Update the corresponding .mdx file with new specs
   - Create a pull request with all changes if any frames were updated
   - If no changes detected, exit silently without creating a PR
Now it is time to add your API keys to GitHub secrets
GitHub secrets are your secure “vault” on GitHub, where you store your API keys. When your automation runs, it can access these secrets, but:
✅ They’re encrypted and hidden from everyone
✅ They don’t appear in logs or code
✅ Only your workflows can access them
✅ You can update them anytime without changing code
That’s why you should not share them around!
Go to your GitHub repository
Click Settings → Secrets and variables → Actions
Click New repository secret
Add these two secrets:
Secret 1: FIGMA_PERSONAL_ACCESS_TOKEN
Name:
FIGMA_PERSONAL_ACCESS_TOKENValue: Your Figma token (starts with
figd_...)
Secret 2: ANTHROPIC_API_KEY
Name:
ANTHROPIC_API_KEYValue: Your Claude API key from console.anthropic.com

After committing the workflow file:
Go to your repository on GitHub
Click the Actions tab
Select “Sync Figma to Docs” workflow
Click Run workflow → Run workflow
Wait 1-2 minutes
Check if a PR was created
Ooookay, once you are done, you should check your live documentation. I used the shadcn dropdown component here.
By now, you know, you can’t process your way out of latency. Make a test account on Mintlify and start experimenting. Let me know how it goes. 😊
Stay tuned for more and enjoy exploring, ⚡️
Romina
— If you enjoyed this post, please tap the Like button below 💛 This helps me see what you want to read. Thank you.
💎 Community Gems
✨ Decode (just launched)
Decode is a white-boarding agent that can design, build, and explain your product features.
🔗 Link
Claude just introduced Skills and a new model called Haiku
Skills are packaged instructions that teach Claude your way of working.
🔗 Link
How to set up Claude Code
Beginner-friendly video
🔗 Link
Do you need a paid Mintlify account to do this or can you use the free version?
Maybe I'm wrong, but I don't believe you ever mention how to connect claud code to figma. You seem to allude to connecting Connect Figma MCP here (https://learn.thedesignsystem.guide/i/176234757/step-3-connect-figma-mcp), but then the youtube video never demonstrated connecting Figma to Claude Code.