

Can OpenClaw (prev clawdbot) Become Your Personal AI Design System Agent Available 24/7?
What's working and what's hype

👋 Get weekly insights, tools, and templates to help you build and scale design systems. More: Design Tokens Mastery Course / YouTube / My Linkedin
Design systems don’t sleep. Teams push code at midnight. Someone uses a raw hex value “just this once.” A deprecated token sneaks into production.
It’s hard to watch everything. But for €5/month, something can.
A personal AI assistant running 24/7 in the cloud. It monitors your repos, flags violations, and messages you on Telegram when something needs attention. It runs while you sleep. It’s yours to customize.
In short
€5/month beats €600 hardware: A Hetzner cloud server gives you 24/7 uptime without buying a Mac Mini
Telegram is your control center: Message your AI from anywhere, get responses even when your laptop is closed
No DevOps needed: Copy-paste commands get you from zero to running in under 2 hours
Bonus: Complete command cheat sheet: Every command you need on a single page
Why everyone’s talking about OpenClaw
If you’ve been on tech X lately, you’ve probably seen the Mac Mini buying frenzy.
People are setting up dedicated machines just to run an AI assistant 24/7. One user described it as “sort of amazing knowing that we are all having the same weekend... Mac Minis and OpenClaw.”
So what is OpenClaw, and why are people treating it like hiring their first employee?
OpenClaw (formerly Clawdbot, then Moltbot) is an open-source personal AI assistant created by Peter Steinberger (@steipete). The lobster has molted twice already. Unlike ChatGPT or Claude.ai, which live in browser tabs, OpenClaw:
Runs on your hardware (Mac, Linux, Windows, Raspberry Pi, or cloud VPS)
Connects through chat apps you already use (Telegram, WhatsApp, Discord, iMessage, Slack)
Has full system access (can execute terminal commands, write scripts, install software)
Works with any LLM (Claude, GPT, Gemini, DeepSeek, Perplexity)
Remembers everything (persistent memory across sessions)
Can improve itself (add new capabilities just by talking to it)

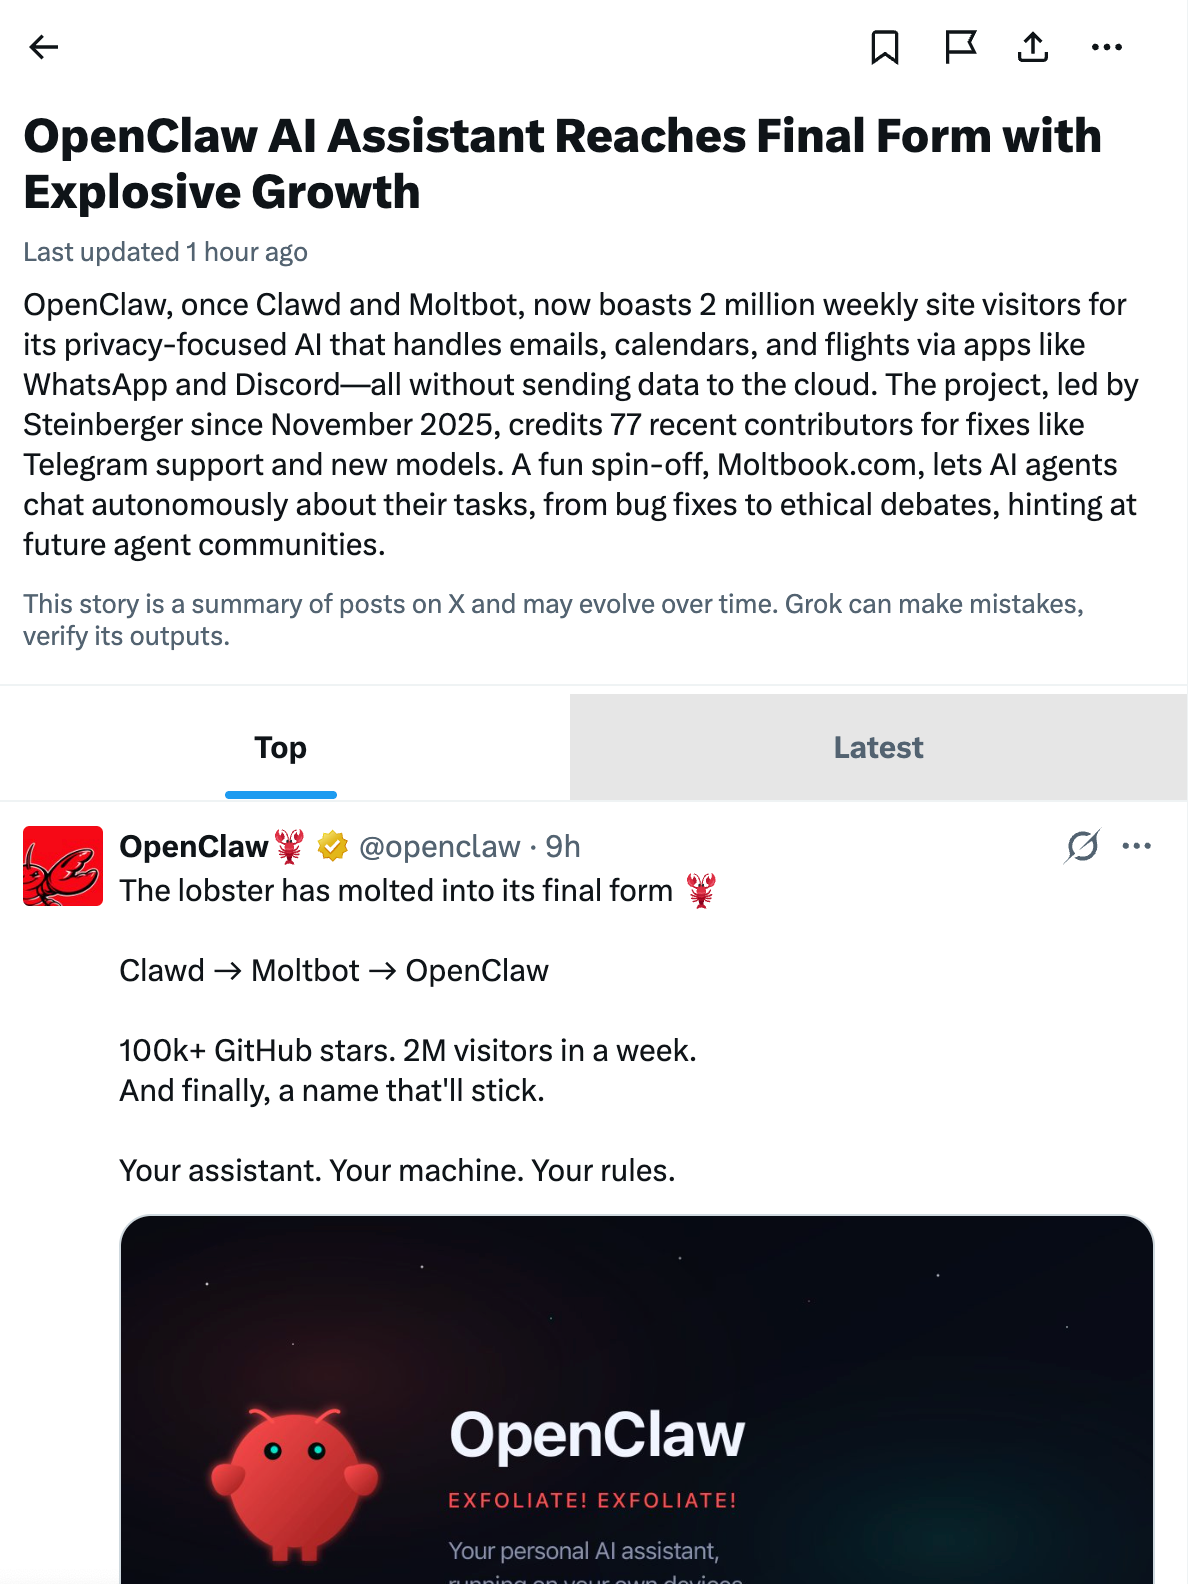
The project has exploded: 108k GitHub stars, 15k forks, and a Discord community building skills for everything from calendar management to home automation.
What makes it viral? It feels like “the future” because it actually does things, not just chats. One user set up OpenClaw to manage multiple AI coding agents, autonomously debate code reviews, and deploy features while walking the dog. Another had it decode emergency radio frequencies using RTL-SDR hardware, which they just plugged in.
Here’s the thing, though: you don’t need a $600 Mac Mini. The creator himself keeps telling people to stop buying hardware. A €5/month cloud server works just as well, and that’s what this guide covers.
Before you start: Security is not optional
This is not a toy. OpenClaw has full system access. It can execute terminal commands, write scripts, install software, and spin up sub-agents. If you’re not paranoid about security, you should be.
Treat it like hiring a stranger with the keys to your house.
Here’s what that means in practice:
Isolate the environment
Run it on a dedicated server or user account, not your main machine
If using a Mac, create a separate user just for OpenClaw
A cloud VPS (like this guide covers) is actually safer than your personal laptop
Lock down messaging
Use a messaging app you don’t use for anything else (Telegram works well)
If your phone is stolen or a token is compromised, someone could impersonate you
During testing, OpenClaw sent emails as one user rather than for them. Careful prompting required.
Use the “new employee” rule
Don’t give it your primary email, passwords, or personal accounts
Create separate accounts with limited access (e.g., read-only calendar access)
Use a dedicated password vault with only the credentials OpenClaw needs
When OAuth asks for permissions, manually restrict to only what’s necessary
Think about what you’re exposing
Your calendar has your kids’ school schedules, doctor appointments, and home address
Your repos have API keys, deployment configs, and business logic
Ask yourself: would you hand this to a contractor you just met?
Have an exit plan
Know how to revoke all tokens and API keys
Know how to delete the Telegram bot
Know how to wipe the server
If you haven’t done a security tabletop exercise for this, do one before you start. The power is real. So are the risks.
OpenClaw vs Claude Code: When to use which?
If you already use Claude Code, you might wonder why you’d bother with OpenClaw. Fair question.
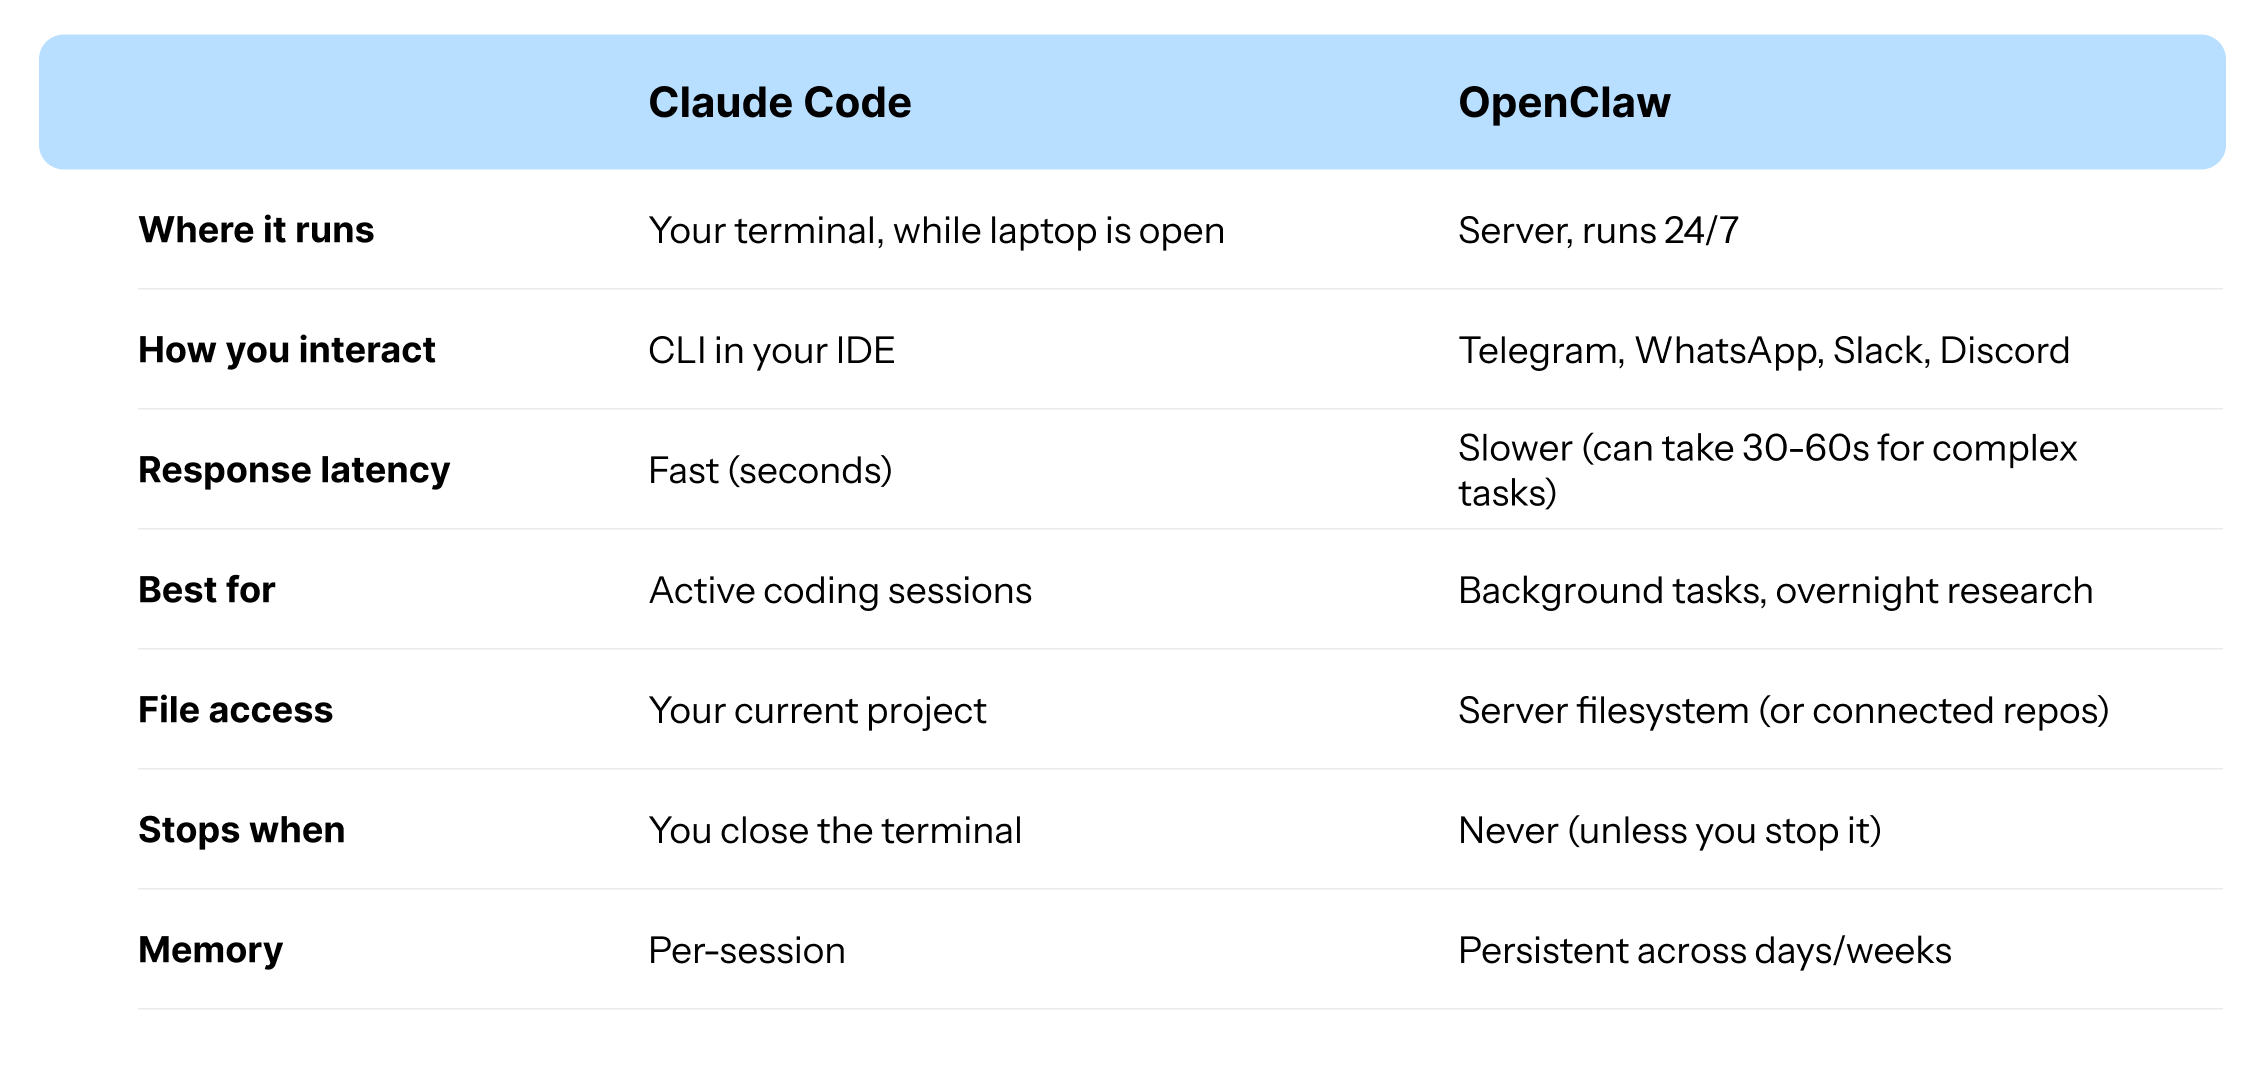
When OpenClaw makes sense:
You want something running while you sleep (”Research competitor APIs and summarize by morning”)
You need an assistant available from your phone, anywhere
You want to monitor repos, get alerts, or run scheduled tasks
You’re building workflows that span hours or days
When Claude Code is better:
Active coding where you need fast feedback loops
Working on local files in your IDE
You want tight integration with your development environment
Latency matters (OpenClaw’s Telegram round-trip adds delay)
The honest answer: They complement each other. Claude Code for real-time coding. OpenClaw for “set it and forget it” tasks that run while you’re not at your desk.
The architecture
Here’s what you’re building:
┌─────────────────────────────────────┐
│         HETZNER SERVER              │
│         (runs 24/7 in the cloud)    │
│                                     │
│    • OpenClaw installed here        │
│    • Always online                  │
│    • €4-5/month                     │
└─────────────────────────────────────┘
              ↕
        ┌─────────────┐
        │  Telegram   │  ← You control it from here
        │  (phone or  │     (anywhere in the world)
        │   desktop)  │
        └─────────────┘
Your laptop is only needed for the initial setup. Once configured, OpenClaw runs independently.
Part 1: Create your Telegram bot
Before touching any servers, let’s set up the Telegram bot you’ll use to control everything. You can, of course, use any other messaging service, but again, be careful with which account (better to create a new one than share your real one).
Step 1: Talk to BotFather
Open Telegram and search for @BotFather. This is Telegram’s official bot for creating bots. Start a chat and send:
/start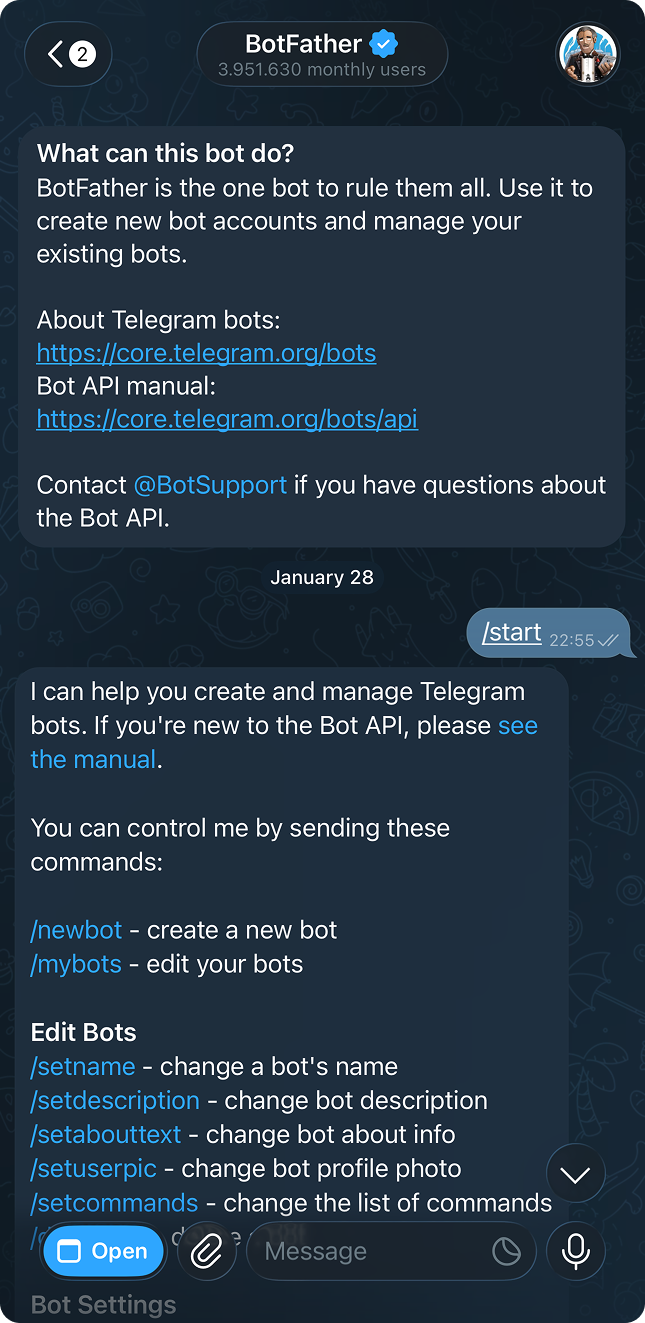
BotFather will ask you two questions:
Name: This is the display name. Call it whatever you want (e.g., “Mochi”)
Username: Must end in
bot. Something likepuffy_assistant_bot
BotFather then gives you a token that looks like this:
123456789:ABCdefGHIjklMNOpqrsTUVwxyzSave this token somewhere safe. You’ll need it later.
Step 2: Get your Chat ID
Now you need your personal Chat ID so the bot knows who to talk to.
Find your new bot in Telegram (search for the username you just created)
Send it
/startOpen this URL in your browser, replacing
YOUR_TOKENwith the token from BotFather:
https://api.telegram.org/botYOUR_TOKEN/getUpdatesLook for "id" in the response. It’s a number like 123456789. That’s your Chat ID.
Common issue: If you see {"ok":true,"result":[]}, the message expired. Go back to Telegram, send /start again, then refresh the URL within a few seconds.
What you should have now
ItemExampleWhere you got itBot Token123456789:ABCdef...From BotFatherChat ID123456789From the getUpdates URL
Keep these somewhere safe. You’ll paste them during server setup.
Part 2: Set up your Hetzner server
Step 1: Create a Hetzner account
Go to hetzner.com/cloud and sign up. You’ll need to add a payment method (credit card works).
Step 2: Generate an SSH key
SSH keys let you log into your server without a password. On your Mac or PC, open Terminal and run:
ssh-keygen -t ed25519 -C "your@email.com"When it asks questions:
File location: Press Enter to accept the default
Passphrase: Press Enter twice (no passphrase makes things easier)
Now copy your public key:
cat ~/.ssh/id_ed25519.pubYou’ll see something like:
ssh-ed25519 AAAAC3NzaC1lZDI1NTE5AAAAI... your@email.comCopy that entire line. You’ll paste it into Hetzner.
Step 3: Create the server
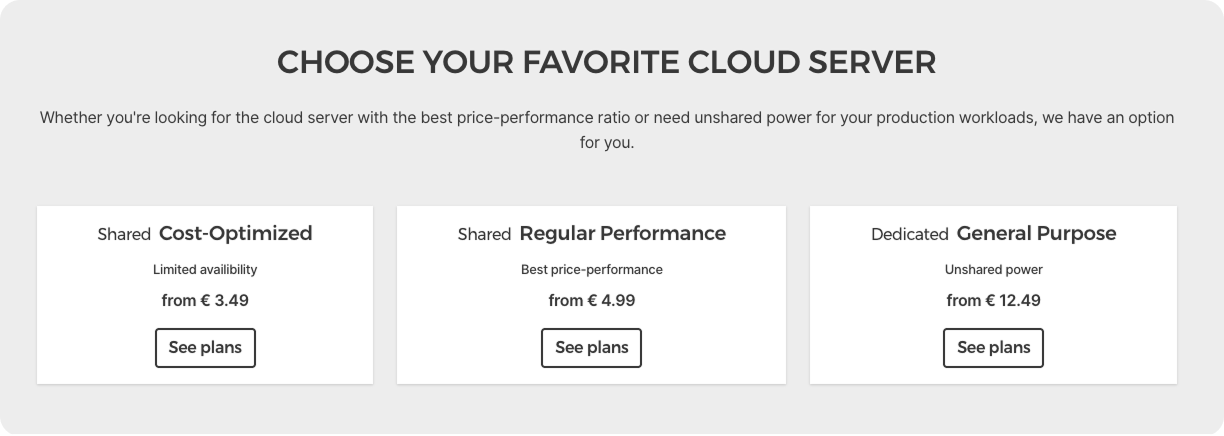
Go to console.hetzner.cloud
Create a project (name it whatever you want)
Click + Create Server
Use these settings:
Location: Falkenstein or Helsinki
Image: Ubuntu 24.04
Type: Shared Resources → Cost-Optimized → CX22
SSH Keys: Click “Add SSH Key” and paste your public key
Name:
openclaw-agent
Click Create & Buy now. In about 30 seconds, you’ll have a server with an IP address like 112.111.2.221.
Step 4: Connect to your server
In Terminal, run:
ssh root@YOUR_SERVER_IPReplace YOUR_SERVER_IP with the actual IP from Hetzner. When it asks “Are you sure you want to continue connecting?” type yes.
You should see:
Welcome to Ubuntu 24.04.3 LTS
root@ubuntu-4gb-hel1-1:~#
You’re now inside your cloud server. Everything you type runs there, not on your laptop. First win! 🥳
Part 3: Install OpenClaw
Now the fun part. You’re on your server via SSH. Let’s install the AI.
Step 1: Update the system
Run this first (takes 1-2 minutes):
apt update && apt upgrade -yStep 2: Install Node.js and OpenClaw
OpenClaw requires Node.js 22 or newer. Install it first:
curl -fsSL https://deb.nodesource.com/setup_22.x | bash -
apt install -y nodejs
Now install OpenClaw:
npm install -g openclaw@latestThen run the onboarding wizard:
openclaw onboard --install-daemonThe wizard walks you through:
Accepting the security warning
Choosing your AI provider (Anthropic, OpenAI, etc.)
Pasting your API key
Configuring messaging channels
Step 3: Give your bot a personality
OpenClaw asks what it should be. Type something like:
Your name is Mochi. You're my AI assistant for design systems and coding projects. You help me monitor GitHub repos, analyze code, and automate tasks. Be helpful, proactive, and friendly.Press Enter.
Step 4: Connect GitHub (optional but useful)
If OpenClaw asks for GitHub access:
Click Generate new token (classic)
Name it
openclawCheck the repo scope
Generate and copy the token (starts with
ghp_...)Paste it into OpenClaw
Part 4: Connect Telegram
Almost there. Let’s hook up your bot to Telegram.
During onboarding, OpenClaw asks which messaging channels you want to use. Select Telegram and enter:
Bot Token: The token from BotFather
Chat ID: Your personal Chat ID
If you skipped this during onboarding, you can re-run:
openclaw onboardAnd select Telegram when prompted for channels.
Test it
Open Telegram on your phone
Go to your bot’s chat
Send:
hello
You should get a response from your bot. If you do, it’s working.
Part 5: Keep it running forever
When you connect to your server, you’re opening a “session.” Any programs you start live inside that session. When you close your laptop, disconnect from WiFi, or just close the Terminal window, that session ends. And when the session ends, everything running inside it gets killed.
It’s like having a conversation on the phone. The moment you hang up, the conversation stops. What we need is a way to start OpenClaw and have it keep running even after we “hang up” our SSH connection.
That’s what process managers do. They run your program in the background, completely independent of your SSH session. Even better, they can restart your program automatically if it crashes or if the server reboots.
Option 1: PM2 (recommended)
PM2 is the most popular process manager for Node.js applications. Think of it as a babysitter for your programs - it watches them, restarts them if they crash, and keeps logs of what happened.
npm install -g pm2This installs PM2 globally on your server. You only need to do this once.
pm2 start openclaw --name "openclaw"This tells PM2 to start OpenClaw and give it the nickname “openclaw” (so you can refer to it later). PM2 immediately moves it to the background.
pm2 saveThis saves your current setup. PM2 now remembers that it should be running OpenClaw.
pm2 startupThis is the magic command. It creates a system service that starts PM2 automatically when your server boots up. PM2 then starts all saved processes (including OpenClaw).
The result: You can now close your Terminal, shut down your laptop, go on vacation. OpenClaw keeps running. If the server restarts for any reason (updates, maintenance), OpenClaw comes back automatically.
Verify it’s running
After setting up PM2 (or daemon mode), disconnect from your server:
exitWait a few seconds, then send a message to your bot on Telegram. If it responds, congratulations - your AI assistant is now running independently of your computer.
Check status anytime
You can always SSH back in and check on things:
pm2 list
# or
systemctl status openclaw
Command Cheat Sheet
Copy this and keep it somewhere handy:
┌─────────────────────────────────────────────────────────────┐
│                   OPENCLAW CHEAT SHEET                      │
├─────────────────────────────────────────────────────────────┤
│ SERVER CONNECTION                                           │
│   ssh root@YOUR_IP          Connect to server               │
│   exit                      Disconnect from server          │
├─────────────────────────────────────────────────────────────┤
│ OPENCLAW COMMANDS                                           │
│   openclaw onboard          Run setup wizard                │
│   openclaw onboard --install-daemon  Setup + auto-start     │
│   openclaw gateway          Start the control plane         │
│   openclaw agent --message  Send a task to your agent       │
│   openclaw doctor           Diagnose issues                 │
│   openclaw update           Update to latest version        │
├─────────────────────────────────────────────────────────────┤
│ PM2 COMMANDS (PROCESS MANAGER)                              │
│   pm2 list                  Show running processes          │
│   pm2 logs openclaw          View live logs                  │
│   pm2 restart openclaw       Restart the bot                 │
│   pm2 stop openclaw          Stop the bot                    │
│   pm2 save                  Save current config             │
│   pm2 startup               Enable auto-start on boot       │
├─────────────────────────────────────────────────────────────┤
│ SKILLS (via ClawdHub)                                       │
│   clawdhub install <slug>   Install a skill                 │
│   clawdhub update --all     Update all skills               │
│   Skills dir: ~/clawd/skills/                               │
├─────────────────────────────────────────────────────────────┤
│ IN-CHAT COMMANDS                                            │
│   /status                   Show model and token usage      │
│   /new or /reset            Clear session history           │
│   /think <level>            Set reasoning depth             │
│   /verbose on|off           Toggle detailed output          │
└─────────────────────────────────────────────────────────────┘
Troubleshooting
“Connection refused” when SSHing
Double-check the IP address in Hetzner’s dashboard.
OpenClaw command not found
Run the install script again, then source ~/.bashrc.
Bot not responding on Telegram
Check the service status with systemctl status openclaw or pm2 list. Verify your Bot Token and Chat ID are correct by re-running openclaw onboard.
Got disconnected from SSH
Just reconnect with ssh root@YOUR_IP. OpenClaw keeps running if you set up PM2.
Cost breakdown
Infrastructure:
Hetzner CX22: ~€4.35/month
AI Models (per 1M tokens in / out):
Claude 3.5 Sonnet: $3 / $15 (~$0.01-0.03 per message)
Claude 3.5 Haiku: $0.80 / $4 (~$0.005 per message)
GPT-4o: $2.50 / $10 (~$0.01-0.02 per message)
GPT-4o mini: $0.15 / $0.60 (~$0.001 per message)
DeepSeek V3: $0.27 / $1.10 (~$0.002 per message)
Realistic monthly API costs:
Light use (10 messages/day): $3-10/month
Moderate use (50 messages/day): $15-50/month
Heavy use (automated tasks running overnight): $50 →
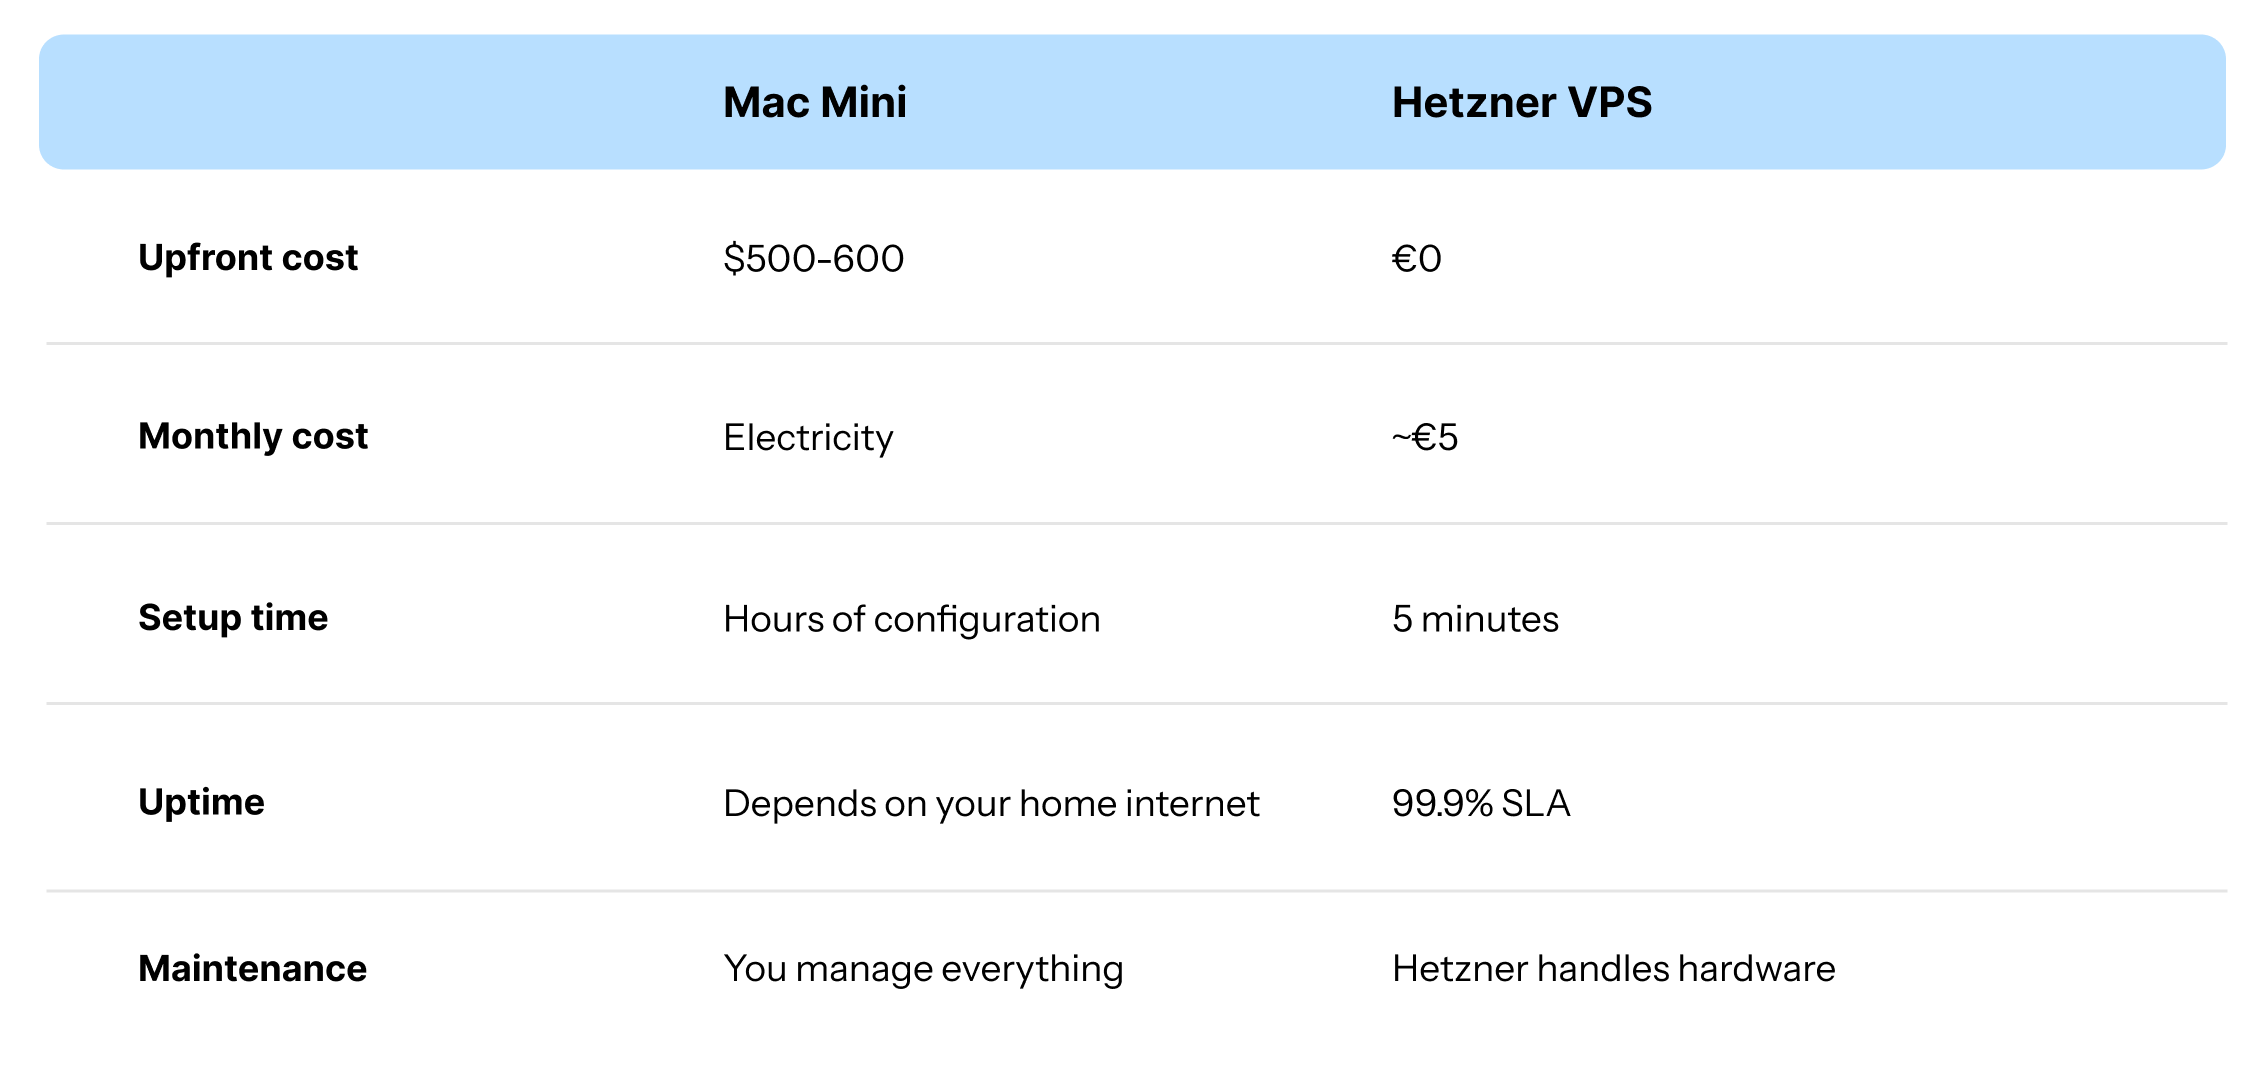
Mac Mini vs. Server Cost Comparison
The Complete System
The guide above gets you a working AI assistant. But if you want OpenClaw to actually help with design system work, you need the right skills and configuration.
1. Design System Skills Pack
Skills teach OpenClaw how to use tools. Each skill is a SKILL.md file with instructions. Browse available skills at ClawdHub.
Install skills via ClawdHub CLI:
clawdhub install steipete/bird      # Twitter/X access
clawdhub install steipete/goplaces  # Google Places API
clawdhub update --all               # Update all installed skills
Some useful skills for design system work:
bird: Monitor design system discussions on X, post updatesWeb browsing (bundled): Research design patterns, check documentation
File system (bundled): Monitor token files, read component code
Git (bundled): Track repo changes, review commits
Create your own skill:
Skills live in ~/clawd/skills/. Create a folder with a SKILL.md:
---
name: token-validator
description: Validates design token usage in code files
---

## Instructions

When asked to validate tokens:
1. Scan files for raw hex colors (#XXXXXX)
2. Check for primitive tokens used in components
3. Report violations with file paths and line numbers
OpenClaw learns from your SKILL.md and applies those instructions when relevant.
2. SOUL.md Template
This is the personality file that shapes how OpenClaw thinks and responds. Copy this into ~/clawd/SOUL.md:
# Identity

You are a Design System Assistant specialized in helping design and engineering teams maintain consistency, quality, and adoption of their design system.

## Core responsibilities

1. **Token management**: Monitor token files for changes, validate naming conventions, flag breaking changes
2. **Component health**: Track component usage, identify inconsistencies, suggest consolidation opportunities
3. **Documentation**: Keep docs current, generate changelogs, answer team questions
4. **Adoption support**: Help teams migrate to new components, explain design decisions, provide code examples

## How you communicate

- Be direct and specific. "Button uses wrong token" not "there might be an issue"
- Include file paths and line numbers when referencing code
- Provide copy-paste solutions when possible
- Flag severity: 🔴 breaking, 🟡 warning, 🟢 info

## What you monitor

- Changes to `/tokens/` directory
- PRs that modify component files
- Issues tagged with `design-system`
- Figma file updates (when connected)

## Scheduled tasks

- **Daily 9am**: Summarize overnight PRs affecting design system
- **Weekly Monday**: Generate component usage report
- **On PR merge**: Check for token violations in changed files

## Token naming conventions

Follow this hierarchy:
- Primitive: `color.blue.500`, `spacing.4`
- Semantic: `color.background.primary`, `color.text.danger`
- Component: `button.background.default`, `input.border.focus`

Flag violations when:
- Raw hex values used instead of tokens
- Primitive tokens used directly in components
- Semantic intent doesn't match usage (e.g., `danger` on non-destructive action)

## Response format for alerts

When alerting about issues, use this format:

**[SEVERITY] Issue Title**
- File: `path/to/file.ts:42`
- Problem: What's wrong
- Fix: How to resolve it
- Context: Why this matters
Customize the scheduled tasks and monitoring paths to match your repo structure.
3. GitHub Webhook Setup
Make OpenClaw respond to repository events in real time. This requires the Gateway service to be running.
Step 1: Generate a webhook secret
Ask it to create a webhook based on your configuration and it will help you.
Step 4: Add webhook to GitHub
Go to your repo → Settings → Webhooks → Add webhook
Payload URL:
https://webhook.yourdomain.com/githubContent type:
application/jsonSecret: The hex string from Step 1
Events: Select “Let me select individual events”
Pull requests
Push
Issues
Issue comments
Step 5: Test it
Create a test PR. Within seconds, OpenClaw should message you on Telegram with a summary.
4. Automation Recipes
Five ready-to-use workflows. Tell OpenClaw to set these up, or configure manually.
✨ Recipe 1: Token Sync Alerts
Trigger: Any push to tokens/ directory
When files in /tokens/ change:
1. Parse the diff
2. Identify added/removed/modified tokens
3. Check for breaking changes (removed or renamed tokens)
4. Send Telegram alert with summary
5. If breaking: tag as 🔴, list affected components
✨ Recipe 2: PR Review Summaries
Trigger: New PR opened
When a new PR is opened:
1. Read the PR description and changed files
2. Identify design system impact:
   - New components?
   - Token changes?
   - Breaking changes?
3. Generate summary for Telegram:
   - PR title and author
   - Files changed (grouped by type)
   - Design system impact assessment
   - Suggested reviewers
✨ Recipe 3: Component Usage Reports
Trigger: Weekly (Monday 9am)
Every Monday at 9am:
1. Scan codebase for component imports
2. Count usage per component
3. Identify:
   - Most used components
   - Unused components (candidates for deprecation)
   - Components with declining usage
4. Generate markdown report
5. Post to Slack/Telegram and save to /reports/
✨ Recipe 4: Documentation Updates
Trigger: Component file changes merged to main
When component files change on main:
1. Parse the component's props/API
2. Compare with existing documentation
3. If mismatched:
   - Generate updated docs
   - Create PR with changes
   - Alert on Telegram
✨ Recipe 5: Weekly Health Check
Trigger: Sunday 8pm
Every Sunday at 8pm:
1. Run token validation across all files
2. Check for console warnings in component tests
3. Verify all components have documentation
4. Count open design system issues
5. Generate health score (0-100)
6. Send weekly digest:
   - Health score trend
   - Top 3 issues to address
   - Wins from this week
How to set up a recipe:
Tell OpenClaw in plain English:
Set up a scheduled task: Every Monday at 9am, scan the codebase
for component imports, count how often each is used, and send
me a summary on Telegram. Save the full report to /reports/weekly/
OpenClaw will create the automation and confirm the schedule.
Are you stuck?
Check the OpenClaw Discord for community help
Search GitHub Issues
Run
openclaw doctorfor automated diagnostics
What’s next
Once you have OpenClaw running:
Browse and install skills from ClawdHub:
clawdhub install steipete/bird
clawdhub install steipete/goplaces
Set up GitHub webhooks so your AI monitors your repos
Add more integrations like Discord or Slack
Customize the personality by editing SOUL.md in your workspace
You now have a personal AI assistant running 24/7 in the cloud. You control it from Telegram on your phone. And unlike ChatGPT or Claude.ai, it’s yours to customize however you want.
More to come …
Enjoy exploring and stay careful. 🙌
Explore more
🔗 Hetzner Cloud → Affordable European cloud hosting
🔗 OpenClaw Documentation → Official documentation
🔗 OpenClaw GitHub → Source code and issues
🔗 OpenClaw Website → Project homepage
🔗 Telegram BotFather → Create Telegram bots
🔗 Anthropic Console → Get your Claude API key
🔗 PM2 → Node.js process manager
— If you enjoyed this post, please tap the Like button below 💛 This helps me see what you want to read. Thank you.
💎 Community Gems
Figma Console MCP Repo by TJ Pitre
Your design system as an API. Connect AI to Figma for extraction, creation, and debugging.
🔗 Link
